The Hand Action tab allows you to create filters based on the actions you’ve taken pre-flop and post flop. The following is an overview of how to use the Hand Action filter section:
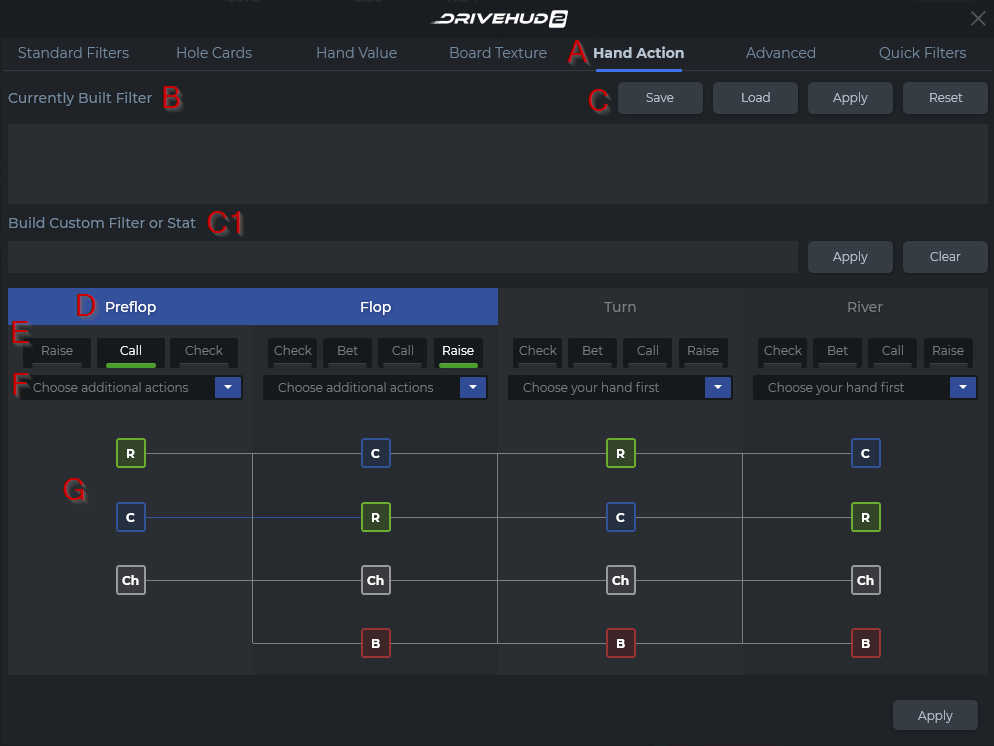
A) Hand Action Tab – This is the fifth tab from the left of the create filter pop-up window.
B) Currently Built Filter – When a filter is created it will display in this box below. You can click on the X in the corner of the filter to remove it, or mouse over the filter to see a full description of the filter.
C) Save Filter Buttons – From here you can Save your currently built filter and name it, Load a filter you created, Apply it to your current data, or Reset (remove) the current filter you created.
C1) Filter or stat building section – You can type in the format for a stat, then you click Save Stat and it will make it available in your reports and your HUD to add. If you create it as a filter, then it will list as a filter you can load
Click here to view the DH2 Filter Language Table.
D) Street Buttons – The Street Button will light up in purple when you select your first action from section E. This will let you know that you’ve set a filter for this street. Click the first action button (section E) again to turn it back to grey (inactive).
E) First Action Button – Select one of the first actions that you want your target player to filter for (ie, Raise, Call, Check). Once you’ve selected your first action, the Street Button will turn purple indicating the filter is active for that street. If you don’t want to add any additional actions for that street (ex: you only want to set a call filter for a pre-flop action), then click choose additional actions from the pull-down menu (section F), and select No Additional Actions. The filter will then be added to the currently built filter section (section B).
F) Additional Action Button – Once you have your first action button selected, you can select multiple additional actions from the pull-down here. Click on as many additional actions as you’d like to add and they will list as purple (active) in the pull-down. Click on them again to deactivate. If you’re done selecting all of your choices, then click anywhere on the filter pop-up to close the additional action button and finalize your filter in the currently built filter section (section B). If you do not want to add any additional actions, then you must select No Additional Actions from the additional action button pull down to add your filter.
G) Hand Action Tree – This is a graphical tree view so you can see which actions you’ve selected on each street easily.
Check out the Other Filter Tabs in DriveHUD 2
- Standard Filters Tab Overview
- Hole Cards Tab Overview
- Hand Value Tab Overview
- Board Texture Tab Overview
- Advanced Tab Overview
- Quick Filters Tab Overview
If you have any further questions or need any setup assistance, please contact support from this page: https://drivehud.com/support/