This is a 20 minute overview of all of the main functions and features in DriveHUD. This tutorial covers all of the major 4 sections of DriveHUD and is an excellent place to start to ensure you get the most out of what DriveHUD has to offer.
Step 1 – Once DriveHUD is downloaded from the website, open file explorer and open the file – DriveHUD-install.exe.
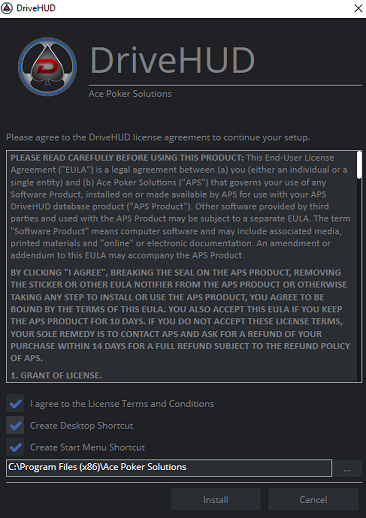
Step 2 – Read the license agreement and check that you agree to the License terms and conditions. By default Create a Desktop Shortcut and Create a Start Menu Shortcut will be selected. If you don’t want to add these, then uncheck those boxes. The default install folder is also listed and can be changed.
Step 3 – Click Install.
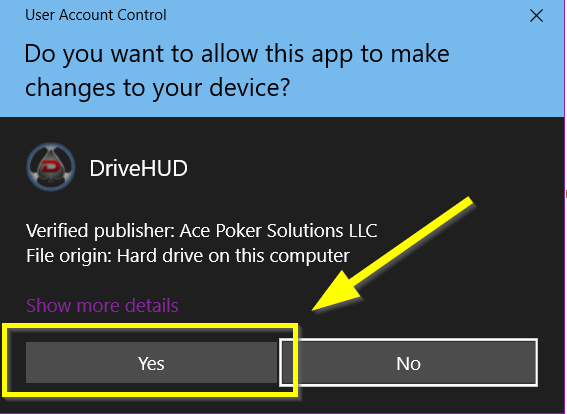
Step 4 – You may see a user access control screen come up and ask you if it’s OK if DriveHUD makes changes to your computer. Click YES to continue.
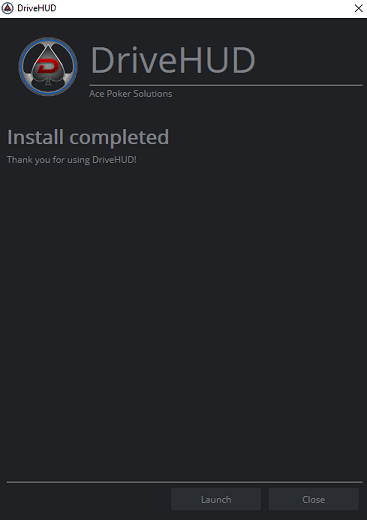
Step 5 – When the installation is complete you’ll get an install complete message. Click the Launch button to run DriveHUD.
Step 6 – If you have any difficulty with installation, please contact our support from the following form: Support Page.
The Dashboard tab on DriveHUD is the main interface of the program for cash games. This is where all of your primary stats and reports are listed. Below is an overview summary of the Dashboard, with more detailed instructions on each section in the subsections below this article.
A) The Dashboard tab – This is the screen above that comes up by default when you load DriveHUD.
B) Tournament tab – This is where all of your Tournament data is stored and displayed. Switch to this tab to see your poker tournament results.
C) HUD tab – This is where you can design your own HUD or select your default HUD for each game type, poker site, and table type you’ll be playing.
D) HUD Run Button – This will default to RUN. Click the Stop button to stop the HUD, or if it’s already stopped, the PLAY (or run) button to engage and run the HUD. If the HUD is running, you will see the STOP button by default.
E) Apps – This is where you can purchase and download other apps and add-ons that can further improve your poker game. Also, you can find the HUD store here, where you can download free and paid HUDs.
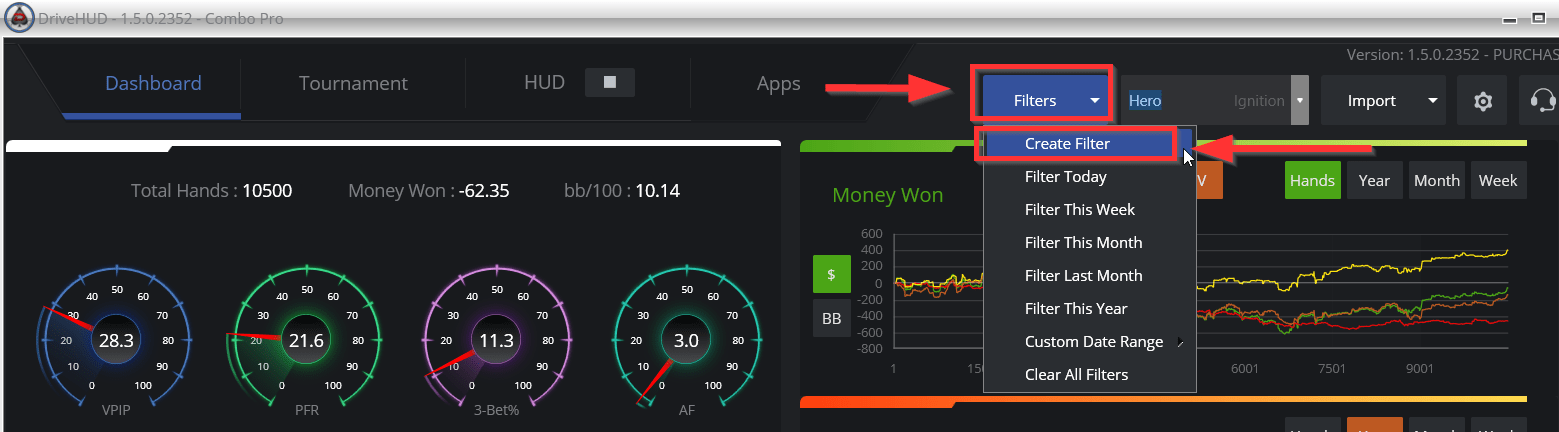
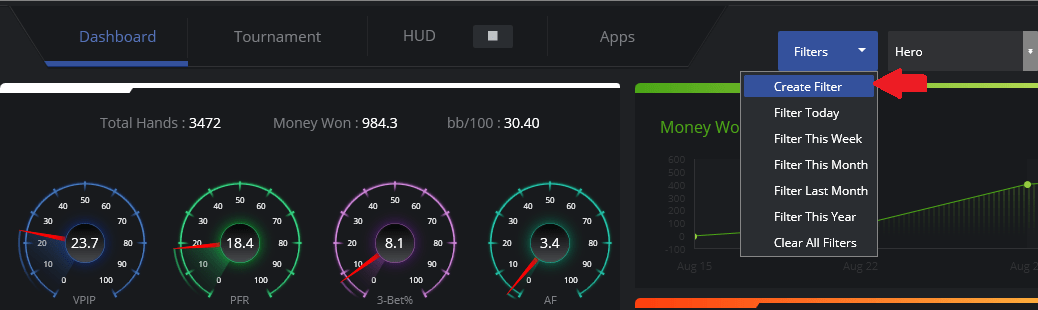
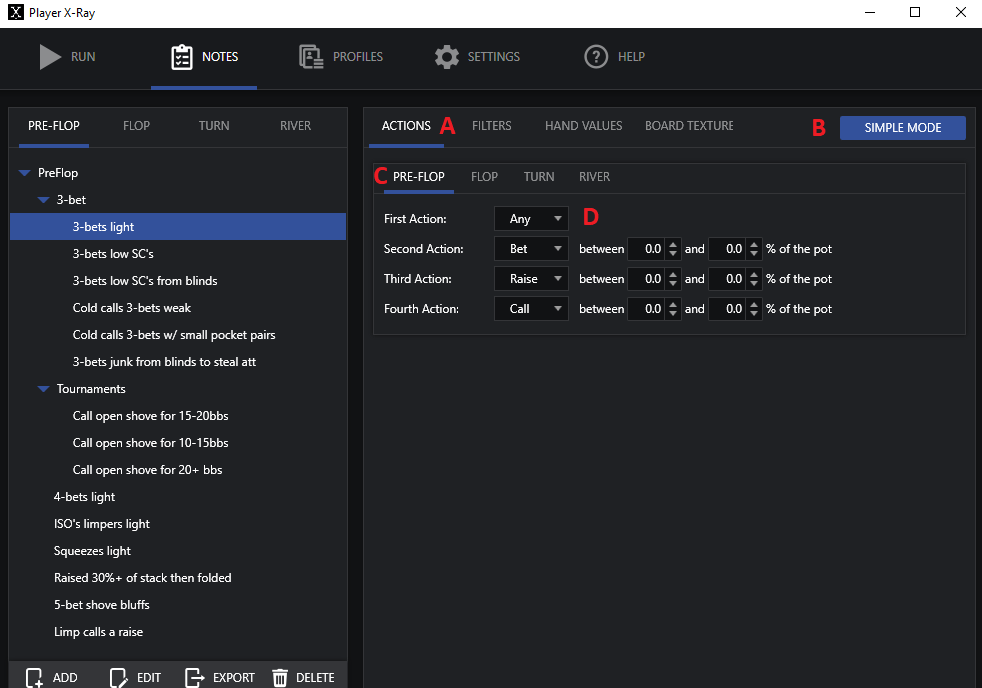
F) Filters – Click this drop down to create a custom filter, or load a quick date filter from the drop-down. Once filters are created, they are shown between the Reports section of DriveHUD (Below R), and the hand grid section (Above letter S).
G) Selected Player – Click here to select which player’s stats you want to load in the Dashboard. You must have a selected player in order to show hand data. You can select from the drop-down list, or begin typing in a player name to locate that player. Player name HERO is used in DriveHUD by default for your player name. To Change this, go to the settings menu (Letter I).
H) Version number & Upgrade – This lists your current version number of DriveHUD. There is also a Purchase button if you wish to purchase or upgrade your current version. The Upgrade button allows you to enter a new serial if you have purchased an upgrade from the DriveHUD store. Simply enter your e-mail and serial into the box to upgrade your current version.
I) Import – Click here to import hand histories that DriveHUD supports. You can import by file or by folder. You can also import by file and click CTRL + left mouse click to select multiple files.
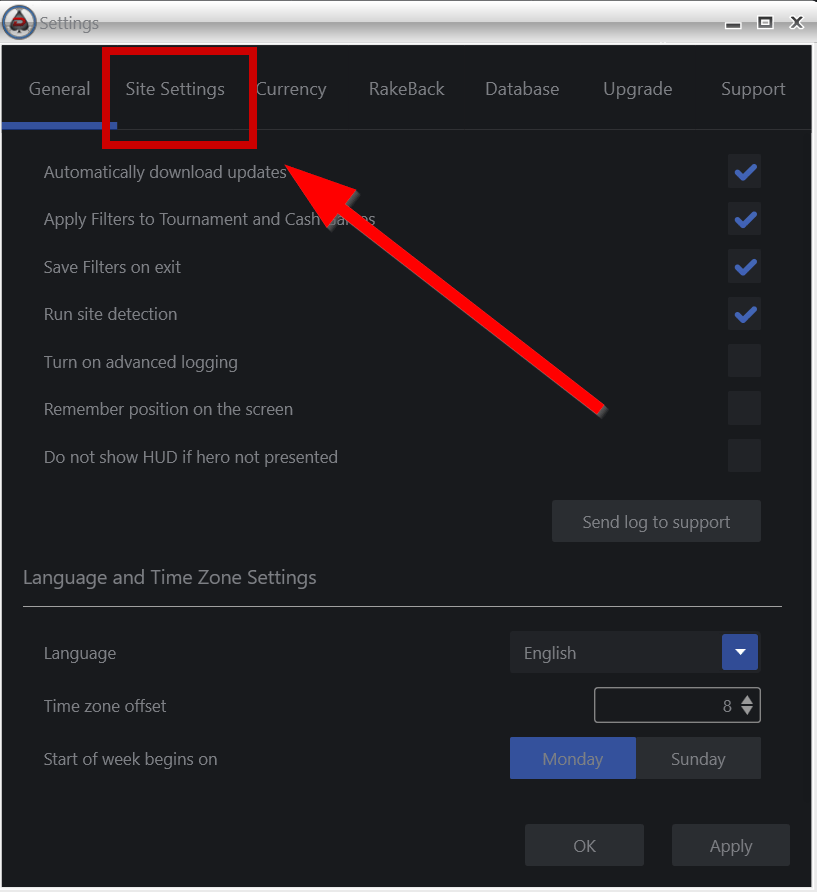
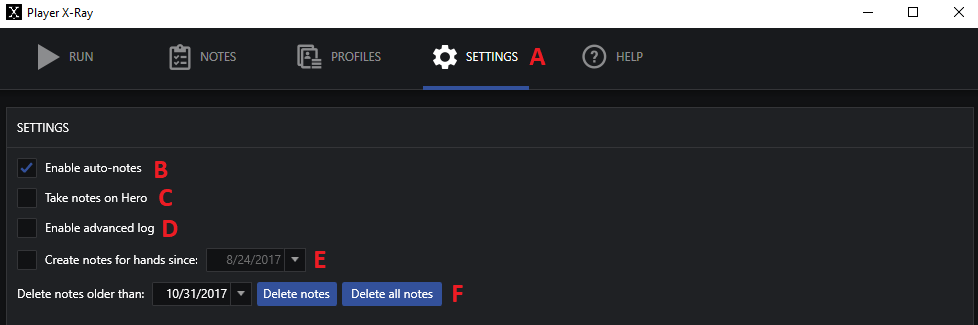
J) Setting Menu – The settings menu contains options such as General options, Site settings, Currency settings, Rakeback and Bonus settings, as well as Upgrade and support form options. If you need to send a log file to support, just go to the settings menu and the support tab. Fill out your e-mail and issue, and attach a log file (selected by default).
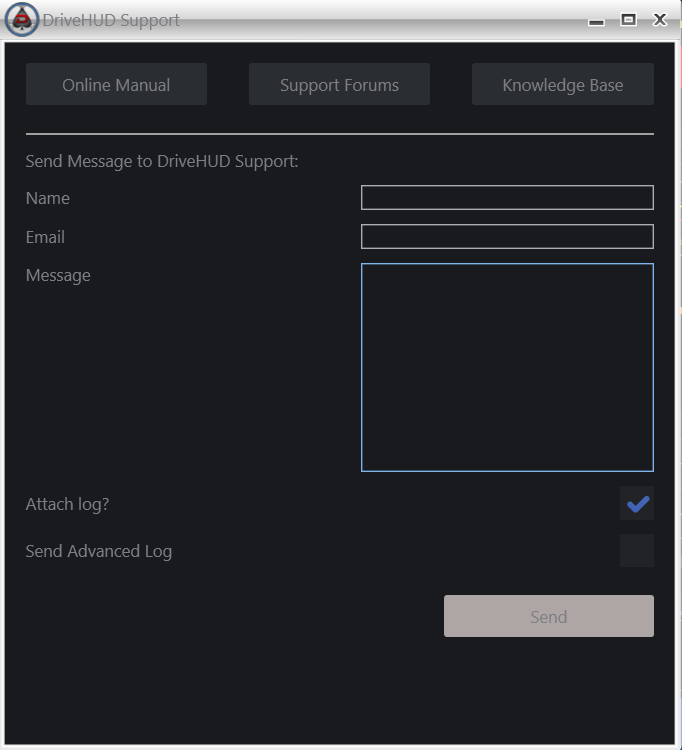
K) Support Button – Click this to send a message to support, access the online manual, the support forums, or the knowledge base. By default, if you send a message to support it will attach your logs. Only click the Send Advanced Log checkbox if you’ve been asked by support to send your advanced logging information.
L) Stats Overview – This section always shows a summary of your current cash games stats. It does not include tournament data. The total hands you’ve played, the amount of money you’ve won or lost, and the bb/100 (big blinds per 100 hands) you’re currently running at.
M) Graphs – Your total money won and bb/100 will be charted here.
N) GraphsPop out button– You can click this tab to pop out a window showing more detailed graphs.
O) SD, NSD & EV Toggle Buttons – You can click on these toggles to show line graphs for SD, NSD or EV values accordingly.
P) Graph Iterations – You can select the length of time that your chart is shown, for this current week, the current month, year, or by hand value.
Q) $ / BB Toggle – You can display hand value or BB value.
R) DriveHUD Gauges – The top 8 important stats will be listed here and shown in a gauge format. VPIP (voluntarily put money into pot), PFR (pre-flop raise), 3-Bet (percentage of the time you re-raised pre-flop), AF (aggression factor), AGG% (Total aggression percent), WTSD (went to showdown), W$SD (won dollars at showdown), W$WSF (won dollars when seen flop percent).
S) Expand Tab – You can click on this tab to close the DriveHUD gauges and graph section and expand the reports section and hands grid. Click again to re-open the gauges and graphs.
T) Reports Tabs – Click on any of the report tabs to show stats for that aspect of your poker game. They are Overall (all general stats for all stakes and game types combined), Position (see your stats by each position at the table), Sessions (Track and display your results by each session you played), Stakes (list and separate your stats out by the stake levels you played), Hole Cards (analyze your game by each hole card type you played), Time (see which time of the day has been most profitable for you), Showdown hands (look at your results based on hands that went to showdown), Poker Site (separate your stats out by the poker site you played at), Opponents (track and display your results by each opponent you played with) , and Population (see your stats by the type of opponent you played with).
U) Stat Headers – You can left click on any column to sort your stats by data results. First left- click will sort by lowest number first, then by highest number, then absolute value. Right-click on the column header at any place to add or remove a stat to the report you’re currently on.
V) Stat Results – Here’s where the actual results for each stat category will be displayed.
W) Last Number of Hands – This drop down will allow you to limit the number of hands that are displayed in the hands grid (section X). The default is last 100. The lower the number you use here, the fewer system resources you’ll use.
X) Show Hole Cards – If hole cards are known, they will show by default when you load the re-player. If you don’t want to see your opponents hole cards, make sure this is unchecked. It is checked by default.
Y) Tagged Hands – Check this if you wish to display only hands you’ve tagged for review in the hands grid (section X). It will default to All tagged hands, but you can select For Review, Bluff, Hero Call, and Big Fold as well.
Z) Poker Equity Calculator – You can click on this at any time to load the equity calculator and run equity calculation on any poker situation. You can also right-click on any hand in the hands grid (section X), and select – run equity calculation and it will auto load all of the hand data for the hand you selected.
AA) Hands Grid Headers – This section shows all of the categories for the individual hands you played. Left click on any header to sort by first lowest number, second click is highest number, and third click is absolute value. Right click on the header to add or remove a category from the header.
BB) Hands Grid – This is where all of your individual hands are displayed. Right-click on any hands to Calculate equity (launch the hand in the equity calculator), export the hand to a forum format (this will copy to your read buffer and you can CTRL+P or right click to paste the info), Replay the hand (this will launch the hand in the hand re-player), Tag the hand for review, or Make a Note on the hand (in which case a note icon will display at the end of the hand in the equity column).
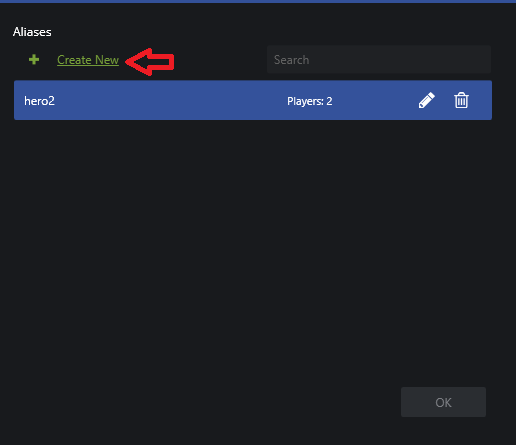
Player aliases are used to combine user ID’s from multiple poker sites into one new player ID (player alias). You can do these easily by following the below steps:
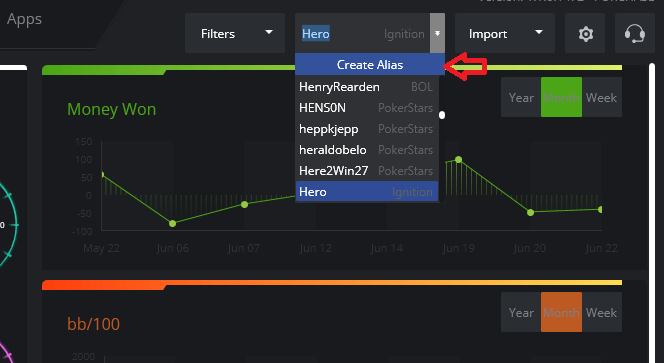
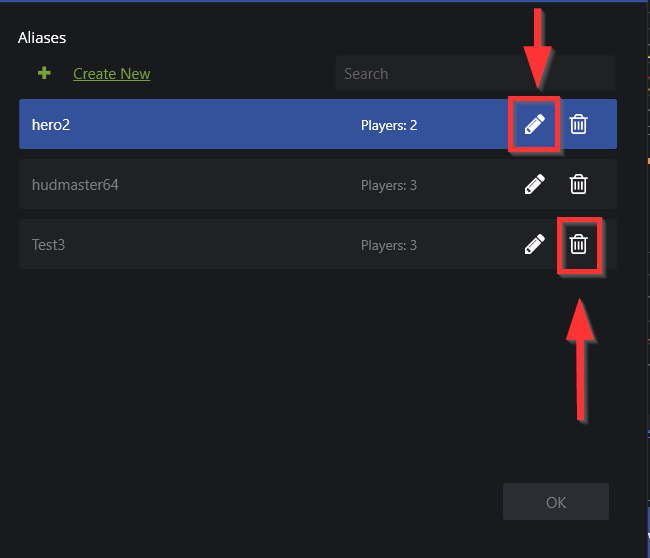
Step 1 – Click on the CREATE ALIAS option from the player ID selection pull down.
Step 2 – From the Alias pop-up menu, click on CREATE NEW.
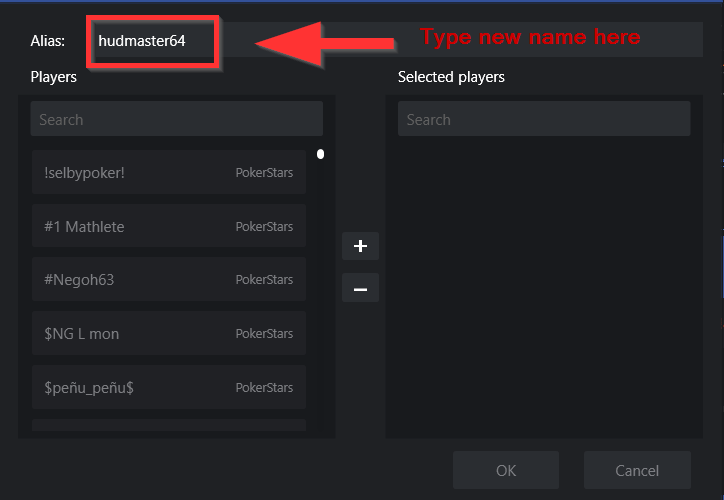
Step 3 – Enter a new Player alias name into the ALIAS text box at the top of the alias window.
Step 4 – From the players’ list on the left, select the players’ names that you’d like to combine into this new alias by either scrolling or typing part of their name into the search text box.
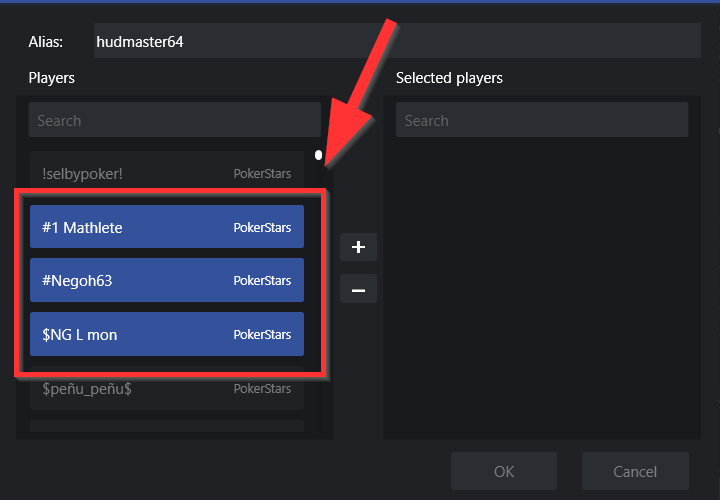
Once you’ve located the players’ names that you’d like to add, simply click on the name(s).
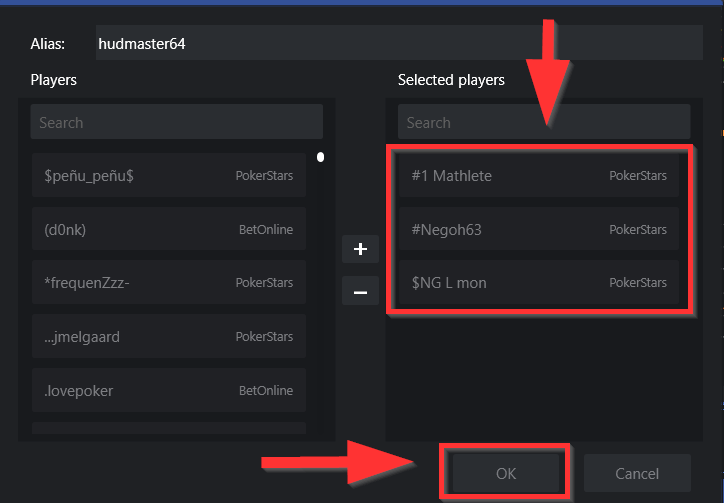
Step 5 – When you’re done selecting the players you’d like to add to your new alias, click on the ‘+’ button. The players’ names will be moved to the right (selected players column).
Now you can click ‘OK’.
A new Player ID will be created using the name you entered in the ALIAS text box at the top of the screen. Remember, to access the new player alias you’ve created, you must select from the player ID drop down at the top of any DriveHUD screen.
Note: To edit or delete an alias, repeat step 2, and then simply click on the trash icon to delete an existing player alias. To edit and add or remove names from an alias, click on the pencil icon from step 2.
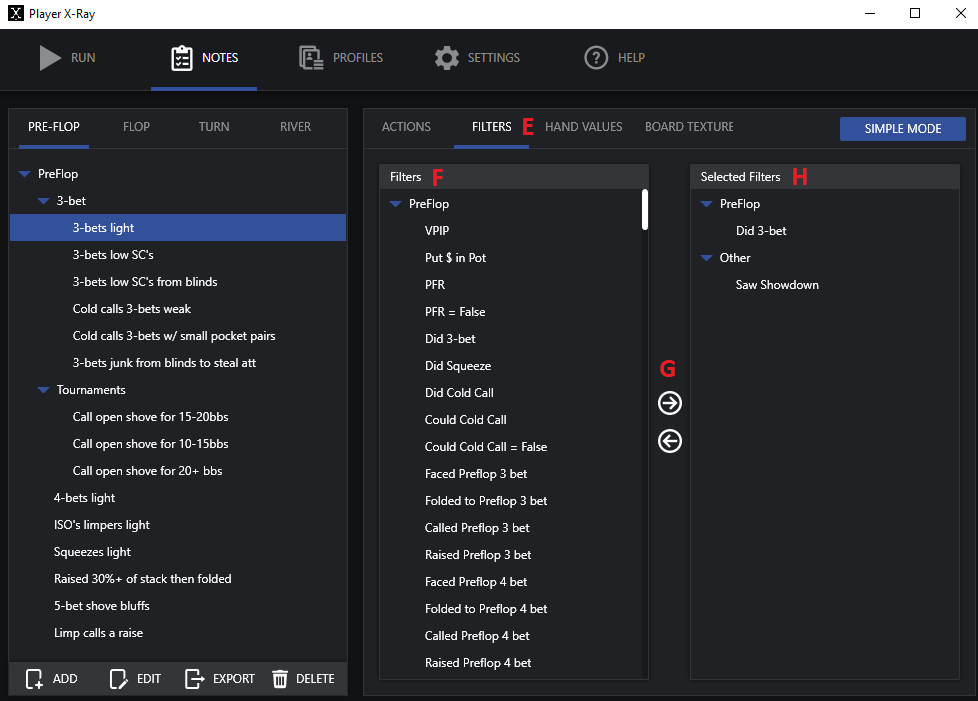
The DriveHUD Filters section is located at the top header of DriveHUD here. Click on FILTERS and select CREATE FILTER.
Once you click on CREATE FILTER, the filter creation window will open up as seen below:
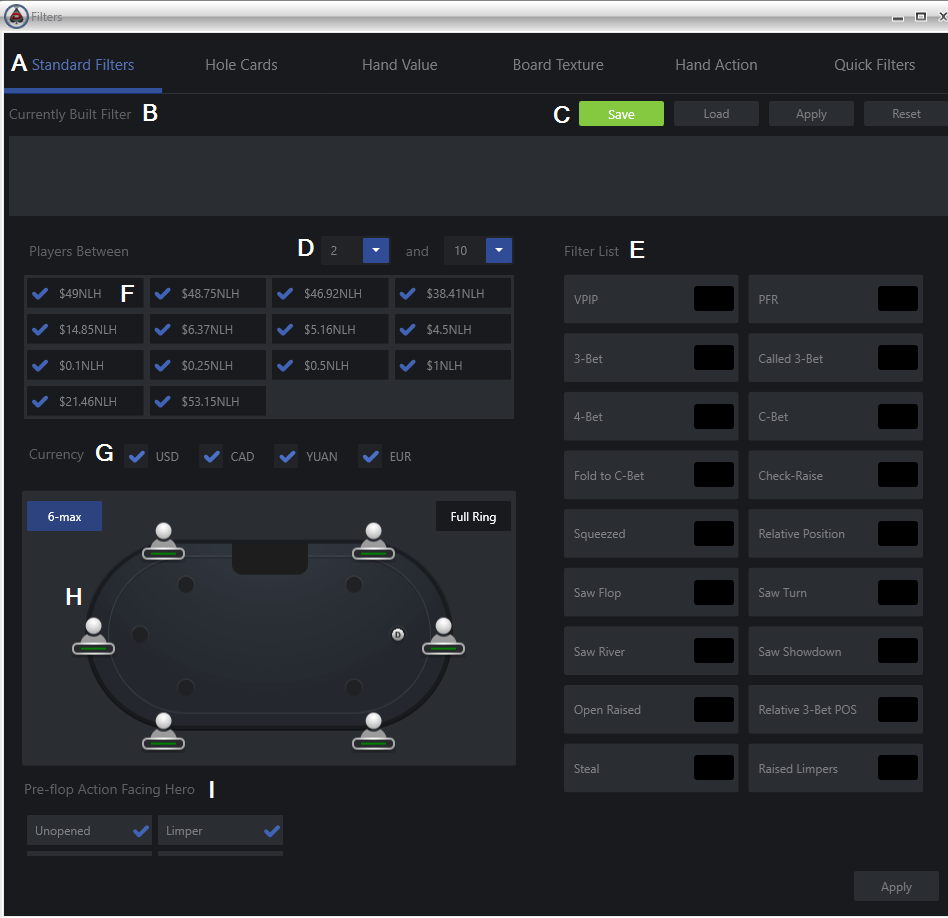
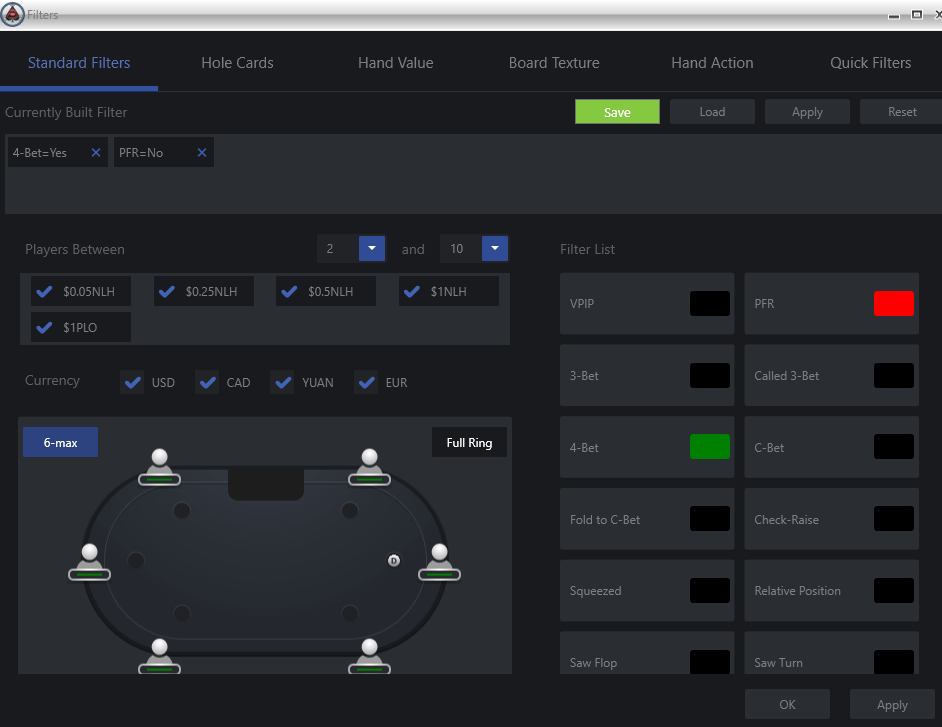
The filter pop-up window is where you can create custom filters, or run pre-made quick filters. below is an explanation of each area of the STANDARD FILTERS Tab, which opens by default:
A) Standard Filters Tab – This is the filter window that opens by default when you click create filters. There’s also Hole cards tab, Hand Value tab, Board Texture tab, Hand Action tab, and Quick Filters tab.
B) Currently Built Filter – When a filter is created it will display in this box below. You can click on the X in the corner of the filter to remove it, or mouse over the filter to see a full description of the filter.
C) Save Filter Buttons – From here you can Save your currently built filter and name it, Load a filter you created, Apply it to your current data, or Reset (remove) the current filter you created.
D) Players Between – Set a filter for the number of minimum and maximum players at the table (2 – 10max).
E) Filter List – Click on any filter in this sidebar list once for it to turn GREEN (sets it to the value=YES). Click the same filter again for it to turn RED (sets it to value=NO), or click it a third time to turn it back off (BLACK).
F) Stake Levels – By default, the stake levels you’ve played are listed here and checked as active. To set a filter for only specific stakes, uncheck the stakes you do not want to list in your filter.
G) Currency – To list only specific currencies, uncheck the ones you do not want to list. By default, they are all active and set to YES.
H) Table Position – A 6-max table is listed by default. All positions are set to GREEN (active), by default. To set a filter for only specific positions at the table, click on the player icon which will turn it RED (not active or value=NO). Click the seat position again to turn it GREEN and active again. To set Full ring positions, click on the Full Ring button to the top right-hand side of the screen.
I) Action Facing HERO -Uncheck any of the filters in this section to create a filter for a specific action that is facing your target player (HERO).
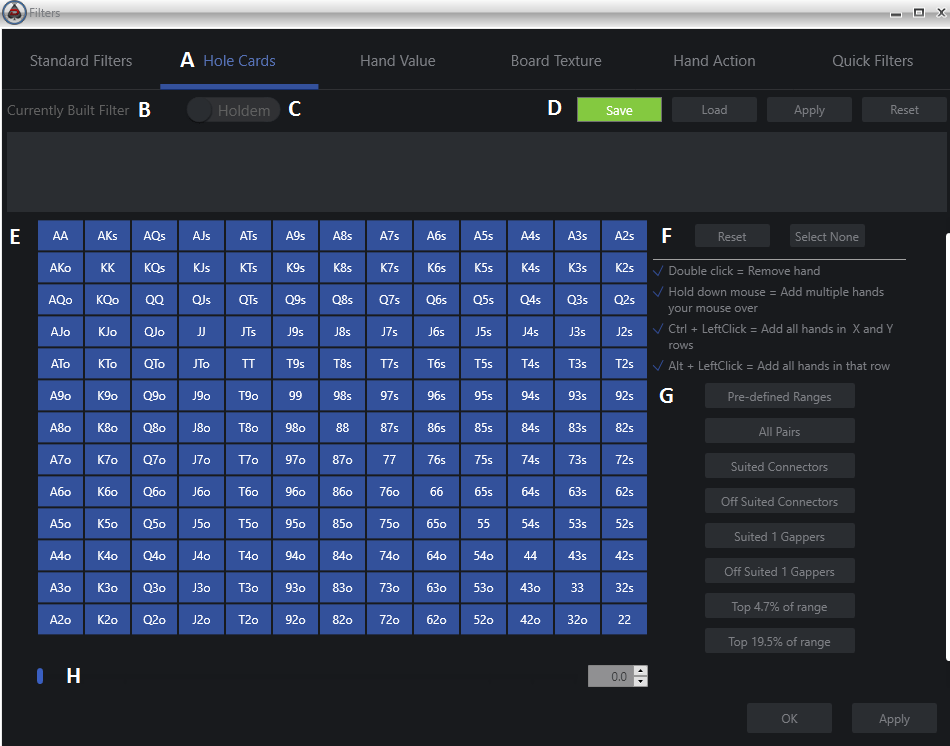
The second tab on the DriveHUD filters pop-up window is the HOLE CARDS tab. Below is an overview of filters and features in this tab:
A) Hole Cards Tab – This is the second tab from the left on the Create Filters pop-up window.
B) Currently Built Filter – When a filter is created it will display in this box below. You can click on the X in the corner of the filter to remove it, or mouse over the filter to see a full description of the filter.
C) Holdem / Omaha Switch – By default, Holdem is displayed for the Hole Card Matrix. Click on this switch to change to the Omaha Hole Cards Filtering section (see Omaha Hole Cards section below for more info).
D) Save Filter Buttons – From here you can Save your currently built filter and name it, Load a filter you created, Apply it to your current data, or Reset (remove) the current filter you created.
E) Hole Card Matrix – By default, all hole cards are selected. To remove a hand click on any hole card box to turn it GREY (OFF). To then the hand back on, click it again PURPLE (ON).
F) Reset / None Buttons – To turn all hole cards in the matrix back on (PURPLE), click on the RESET button. To remove all hole cards from the matrix, click on the SELECT NONE button (turns all hole cards GREY).
G) Quick Hand Sets – The following buttons add hand groups instantly to the hand grid matrix. Pre-defined Ranges (see Pre-defined Ranges below for more info), All Pairs (Turns all pocket pairs on), Suited Connectors (turns all suited connectors on – ex: 67s, 87s), Off suited Connectors (turns all off suited connectors on – ex: 67o,78o), Suited 1 Gappers (Turns all suited 1 gappers on – ex: 57s,68s), Off suited 1 Gappers (turns all off suited 1 gappers on – ex: 57o,9Jo), Top 4.7 of range (turns on hand range: TT+, AQo+), Top 19.5% of range (turns on hand range: 22+, A9s+, ATo+, KTs+, KTo+, QTs+, QTo+, JTs, JTo, 76s-T9s). Click on the button again to turn the hand range off and remove it from the hand matrix grid.
H) Hand Range Scrollbar – Drag the purple line to any point on the hand line to add that hand range percentage to the grid. Hands are added based on their EV if all hands were all-in pre-flop. Enter a percentage number in the input box to instantly add that percentage of hands to the hand matrix grid.
Pre-defined Ranges
The pre-defined range section is an easy way to input a lot of hands into the hand grid matrix with just a couple of clicks. These pre-defined ranges are set up by popular pre-flop scenarios and explained more below:
A) Pre-defined Range Sections – There are four tabs in this section. The Open Raise (no one has raised pre-flop, and someone is the first to open raise) tab will open by default. It also includes the Calling Range tab (a pre-defined range of hands someone will typically call a raise with from each position), 3-bet/4-bet tab (a typical range someone would 3-bet and 4-bet with from each position at the table, and Limped Pot tab (a range of hands someone might open limp with. This tab does not have any positions, just a general open limp range).
B) Table Position – Each range of hands is broken down by position at the table. Just click on any of the table positions to add that hand range to the hand grid matrix. You can then adjust these ranges by removing or adding more hands.
Omaha Hole Cards
Since Omaha has so many more combination possibilities, a hand grid matrix is not possible within a reasonable size format. Instead, a list of typical hole card combos is listed as shown below:
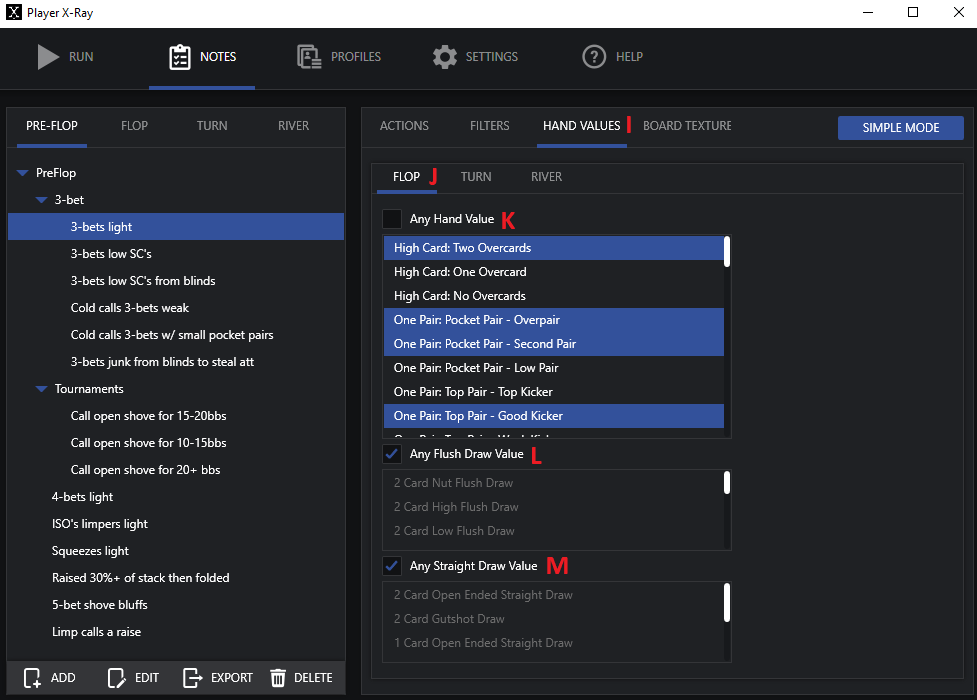
The Hand Value tab of the filter section allows you to create a filter for any specific hand value on the flop, turn, or river. The below section is an over view of the Hand Value tab:
A) Hand Value Tab – This is the third tab from the left of the create filter pop-up window.
B) Currently Built Filter – When a filter is created it will display in this box below. You can click on the X in the corner of the filter to remove it, or mouse over the filter to see a full description of the filter.
C) Save Filter Buttons – From here you can Save your currently built filter and name it, Load a filter you created, Apply it to your current data, or Reset (remove) the current filter you created.
D) Street Buttons – From here select whether you want to set a hand value filter for the Flop, Turn or River. You can set multiple filters for each street. Just click on any filter (from Section F) to add that filter to the currently built filter section.
E) Fast Filter – This sidebar provides many common hand values people filter for. Simple click on it once to add it as a filter with the value set as YES (GREEN). Click on it again to set it the filter value to NO (RED), and click it a third time to reset or remove it.
F) Hand Value Section – This is a complete list of hand values. Simply left click on any of them to add them as a filter in the currently built filters section.
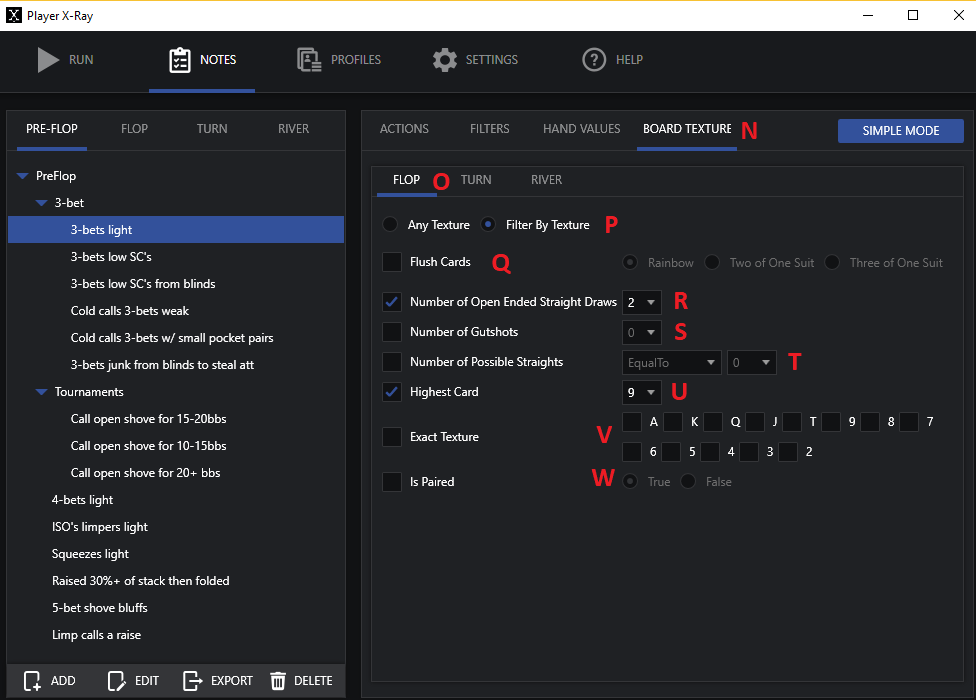
The board texture tab allows you to create any type of flop, turn or riverboard texture or specific combo. Below is an overview of the board texture filter creation tab:
A) Board Texture Tab – This is the fourth tab from the left of the ‘create filter’ pop-up window.
B) Currently Built Filter – When a filter is created it will display in this box below. You can click on the X in the corner of the filter to remove it, or mouse over the filter to see a full description of the filter.
C) Save Filter Buttons – From here you can Save your currently built filter and name it, Load a filter you created, Apply it to your current data, or Reset (remove) the current filter you created.
D) Board Buttons – There are three board buttons, the flop, turn, and river. Click on any of these to bring up board texture options in Section G, and also display specific cards in Section E.
E) Specific Flop – You can click on any of the cards in this section and a pop-up will appear (see below). You can then select any specific combination of cards to run a filter for.
F) Poker Suit Buttons – If you don’t want a specific flop card, you can select a specific suit combination. Just click on the club icon for example, as shown in the overview above, to show a club instead of a specific card.
G) Common Flop Textures Section – In this section, you can select any of the common flop textures, such as Rainbow, for example, and it will add a filter to the currently built filter section (section B). For any of the options that have pulldowns, you’ll need to select your options from the pull-down, and once you have selected from your pull-down options, then click on the filter again to add it to the currently built filter section (section B).
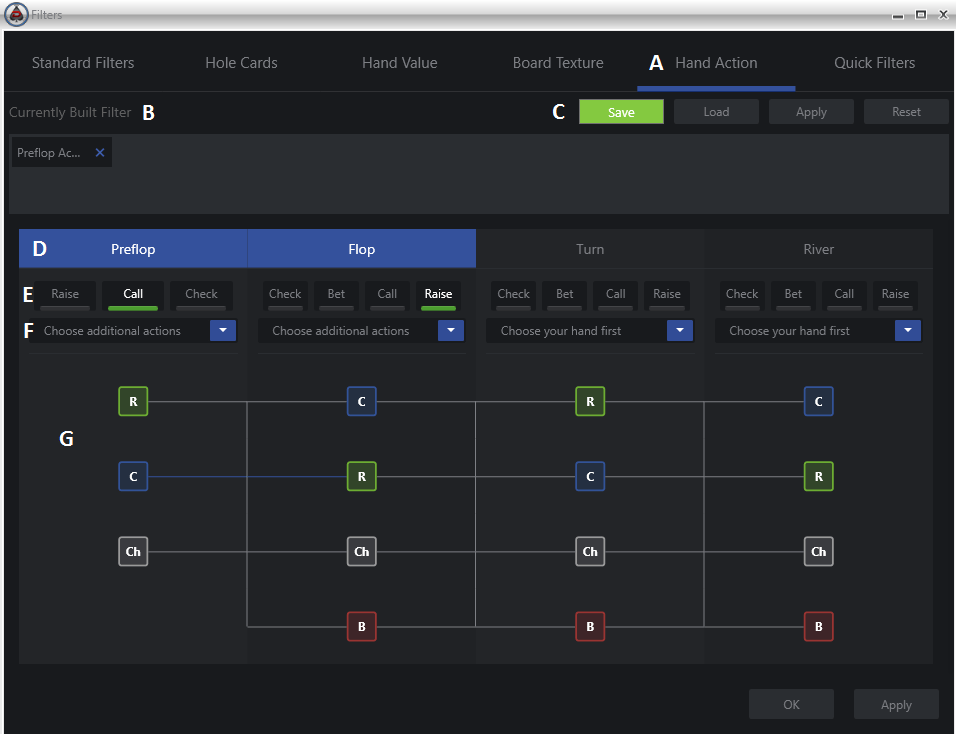
The Hand Action tab allows you to create filters based on the actions you’ve taken pre-flop and post flop. The following is an overview of how to use the Hand Action filter section:
A) Hand Action Tab – This is the fifth tab from the left of the create filter pop-up window.
B) Currently Built Filter – When a filter is created it will display in this box below. You can click on the X in the corner of the filter to remove it, or mouse over the filter to see a full description of the filter.
C) Save Filter Buttons – From here you can Save your currently built filter and name it, Load a filter you created, Apply it to your current data, or Reset (remove) the current filter you created.
D) Street Buttons – The Street Button will light up in purple when you select your first action from section E. This will let you know that you’ve set a filter for this street. Click the first action button (section E) again to turn it back to grey (inactive).
E) First Action Button – Select one of the first actions that you want your target player to filter for (ie, Raise, Call, Check). Once you’ve selected your first action, the Street Button will turn purple indicating the filter is active for that street. If you don’t want to add any additional actions for that street (ex: you only want to set a call filter for a pre-flop action), then click choose additional actions from the pull-down menu (section F), and select No Additional Actions. The filter will then be added to the currently built filter section (section B).
F) Additional Action Button – Once you have your first action button selected, you can select multiple additional actions from the pull-down here. Click on as many additional actions as you’d like to add and they will list as purple (active) in the pull-down. Click on them again to deactivate. If you’re done selecting all of your choices, then click anywhere on the filter pop-up to close the additional action button and finalize your filter in the currently built filter section (section B). If you do not want to add any additional actions, then you must select No Additional Actions from the additional action button pull down to add your filter.
G) Hand Action Tree – This is a graphical tree view so you can see which actions you’ve selected on each street easily.
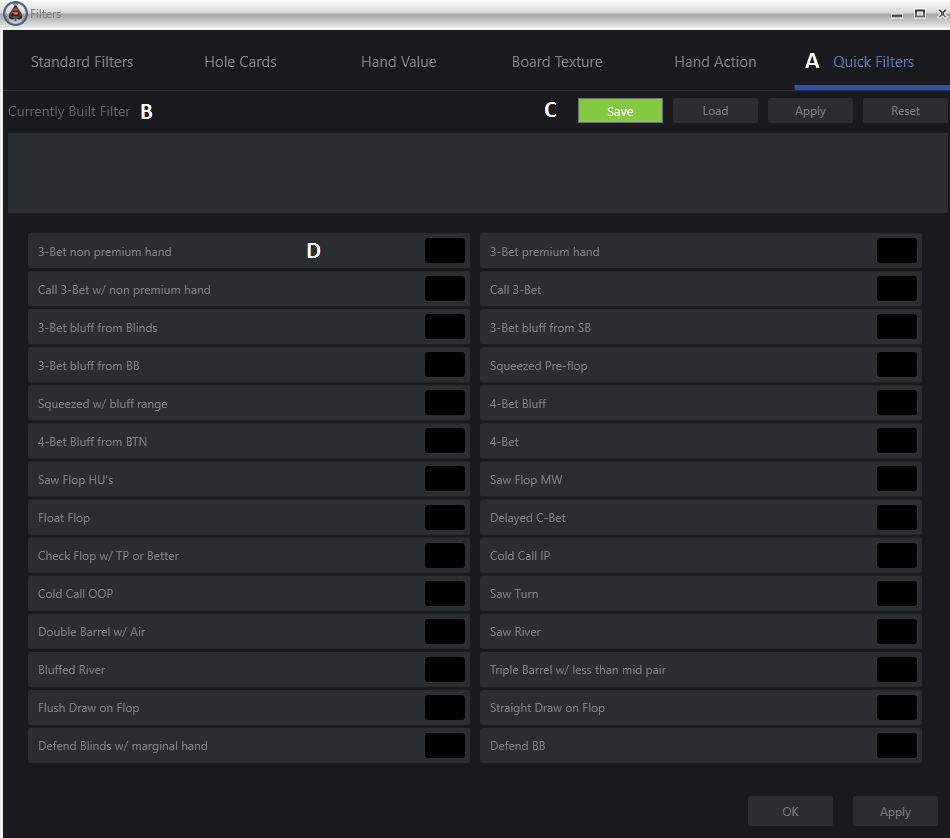
The quick filters section allows you to generate common pre and post flop filters with just one click. The following is an overview of the Quick Filters section:
A) Quick Filters Tab – This is the first tab from the right of the create filter pop-up window.
B) Currently Built Filter – When a filter is created it will display in this box below. You can click on the X in the corner of the filter to remove it, or mouse over the filter to see a full description of the filter.
C) Save Filter Buttons – From here you can Save your currently built filter and name it, Load a filter you created, Apply it to your current data, or Reset (remove) the current filter you created.
D) Quick Filter Buttons – Click on any filter from the list to add it to the current built filters section (section B). Once you select a filter it will turn GREEN indicating it’s active (set to YES). Click the same filter again to turn it RED, indicating it’s set to NO (or, filter for any scenario EXCEPT this situation).
To create a custom filter, simply click on the create filter menu option from the filter drop down at the top of DriveHUD.
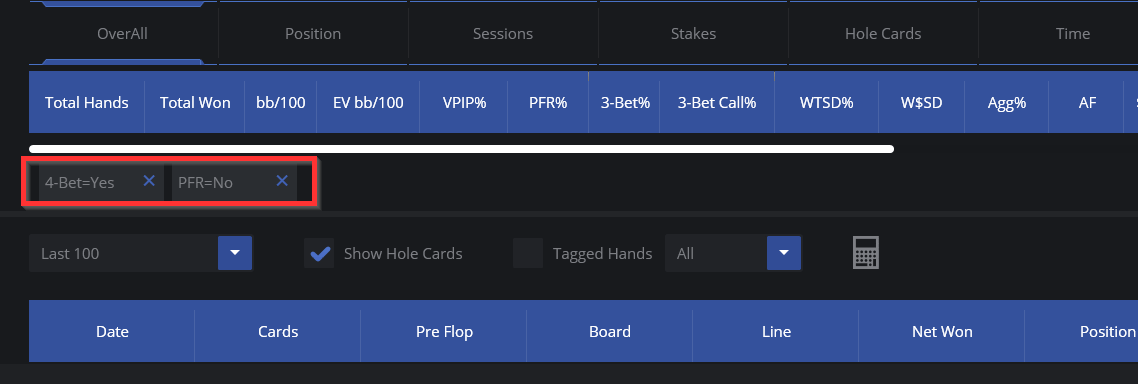
You will then get a filter screen pop-up, where you can design a filter for a specific poker situation and display only that filter situation in DriveHUD. For example, say you want to create a filter every time you cold 4-bet a hand. That would mean you’d want to see hands where you were not the initial pre-flop raiser OR the person who 3-bet. To do that you’d click on the PFR button in standard filters TWICE (until it turned red). This would mean you’re adding a filter for situations in which you were NOT the pre-flop raiser. Then you’d click on the 4-bet filter ONCE, so it would turn GREEN. This would mean that 4-bet’s are set to YES, and you’re looking for spots you 4-bet. The combination of having PFR OFF and 4-bet ON would create a filter where you’re looking at only data when you cold 4-bet another player.
Notice that it will say that 4-bet=yes (green), and PFR=no (red) in the currently build filter section. If this is the filter you want to run, then click on APPLY and OK, and the filter will load and it will show the filter in the middle of DriveHUD in between the reports tab, and the hand grid as shown below:
To remove a part of the filter or the whole filter, simply click on the X button on each of the filters you have listed between the reports page, OR click on the FILTERS pull down from the top again, and select CLEAR ALL FILTERS.
A quick and simple video on how to create a custom filter in DriveHUD. We take the example of the user completing from the small blind, and then check/folding on the flop.
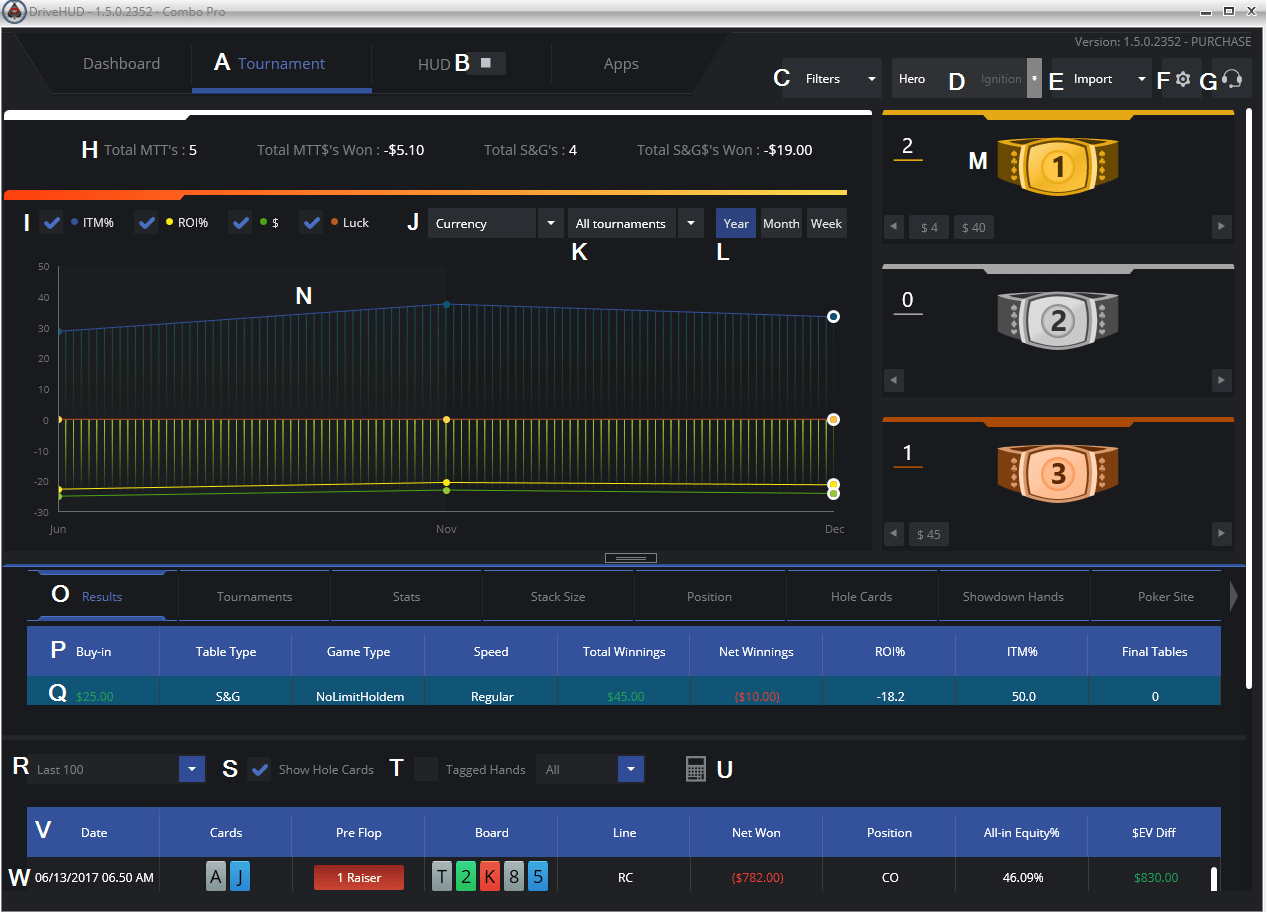
The Tournament tab is the main DriveHUD tournament interface. Here is where you’ll find all of your MTT (multi-table tournaments), and S&G (sit and go) statistics. Below is an overview of the tournament interface:
A) Tournament Tab – This is the tab that is present in all sections of DriveHUD that allows you to view your tournament statistics. Tournament and cash game statistics are kept separate. Cash game statistics can be viewed from the Dashboard Tab.
B) HUD Tab – This is where you can design your own HUD or select your default HUD for each game type, poker site, and table type you’ll be playing. This button on the tab is used to start and stop the HUD. Click the Stop button to stop the HUD, or if it’s already stopped, the PLAY (or run) button to engage and run the HUD. If the HUD is running, you will see the STOP button by default.
C) Filters – Click this drop down to create a custom filter, or load a quick date filter from the drop-down. Once filters are created, they are shown between the Reports section of DriveHUD (Below P), and the hand grid section (letter U).
D) Selected Player – Click here to select which player’s stats you want to load in the Dashboard. You must have a selected player in order to show hand data. You can select from the drop-down list, or begin typing in a player name to locate that player. Player name HERO is used in DriveHUD by default for your player name. To Change this, go to the settings menu (Letter I).
E) Import – Click here to import hand histories that DriveHUD supports. You can import by file or by folder. You can also import by file and click CTRL + left mouse click to select multiple files.
F) Setting Menu – The settings menu contains options such as General options, Site settings, Currency settings, Rakeback and Bonus settings, as well as Upgrade and support form options. If you need to send a log file to support, you go to the settings menu and the support tab. Fill out your e-mail and issue, and attach a log file (selected by default).
G) Power Button – This closes down your DriveHUD session. Above the power button lists your current version number of DriveHUD. There is also a Purchase button if you wish to purchase or upgrade your current version. The Upgrade button allows you to enter in a new serial if you have purchased an upgrade from the DriveHUD store. Simply enter your e-mail and serial into the box to upgrade your current version.
H) Tournament Results Over View – Here you’ll see a brief overview of how many MTT’s, and S&G’s you’ve played, along with how many you’ve won.
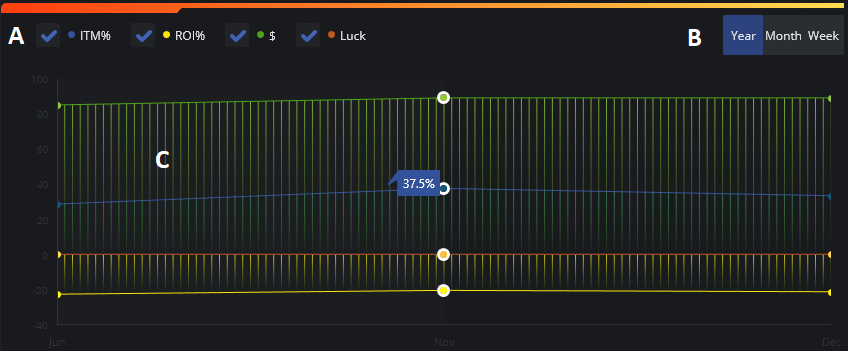
I) Graphing Options – Here you can turn on/off different lines on the tournament graph by checking and unchecking the four option boxes. ITM% (In the money – percentage of the time that you entered a tournament and cashed), ROI% (Return on investment – percentage of return you got on the amount you invested in tournament buy-ins), $ (Total dollars won), Luck (How lucky you were in your all-in situations in tournaments).
J) Currency Selector – From this drop-down menu, you can select currency, chips or BB.
K) Tournament Selector – From this drop-down menu, you can select to display all tournaments, S&G or MTT.
L) Graph Iterations – You can select the length of time that your chart shows, for this current week, the current month, or year.
M) Tournament Bracelets – This will display your first place, second place, and third place finishes for MTT’s and S&G’s. The most recent win amounts will display below the bracelet. You can review and re-play any of these wins by simply clicking on the tournament win amount below the bracelet.
N) Tournament Graph – A visual representation of how you’ve performed in your tournaments. To turn off or on graphing options, select the corresponding graphing options in section I.
O) Tournament Reports – Click on any of the report tabs to show stats for that aspect of your poker game. They are Results (overall results from each tournament type you’ve played), Tournaments (complete list of every tournament you’ve played, initially sorted by date), Stats (the overall stats for each tournament type you’ve played), Stack size (shows what your stats are based on your different stack sizes in tournaments, and how you’ve performed), Position (see your stats by each position at the table), Hole Cards (analyze your game by each hole card type you played), Showdown hands (look at your results based on hands that went to showdown), Poker Site (separate your stats out by the poker site you played at).
P) Stat Headers – You can left-click on any column to sort your stats by data results. First left-click will sort by lowest number first, then by highest number, then absolute value. Right-click on the column header at any place to add or remove a stat to the report you’re currently on.
Q) Stat Results – Here’s where the actual results for each stat category will display.
R) Last Number of Hands – This drop down will allow you to limit the number of hands that are displayed in the hands grid (section W). The default is last 100. The lower the number you use here, the fewer system resources you’ll use.
S) Show Hole Cards – If hole cards are known, they will show by default when you load the re-player. If you don’t want to see your opponents’ hole cards, make sure this is unchecked. It is checked by default.
T) Tagged Hands – Check this if you wish to display only hands you’ve tagged for review in the hands grid (section W). It will default to All tagged hands, but you can select For Review, Bluff, Hero Call, and Big Fold as well.
U) Poker Equity Calculator – You can click on this at any time to load the equity calculator and run equity calculation on any poker situation. You can also right-click on any hand in the hands grid (section W), and select – run equity calculation and it will auto load all of the hand data for the hand you selected.
V) Hands Grid Headers – This section shows all of the categories for the individual hands you played. Left-click on any header to sort by first lowest number, the second click is the highest number, and the third click is the absolute value. Right click on the header to add or remove a category from the header.
W) Hands Grid – This is where all of your individual hands are displayed. Right-click on any hands to Calculate equity (launch the hand in the equity calculator), export the hand to a forum format (this will copy to your read buffer and you can CTRL+P or right click to paste the info), Replay the hand (this will launch the hand in the hand re-player), Tag the hand for review, or Make a Note on the hand (in which case a note icon will display at the end of the hand in the equity column).
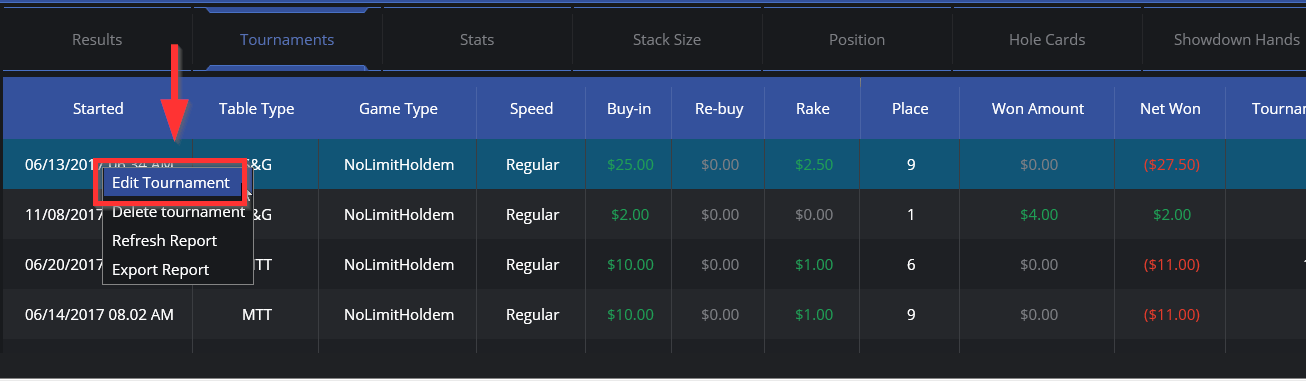
If you’d like to edit or change a result, tournament type, buy-in, and final result, simply go to the Tournament Tab in DriveHUD and right click on the Tournament Report tab. Select Edit Tournament as shown below:
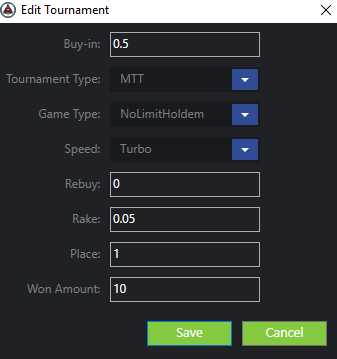
You’ll get a pop-up with the following information:
Simply type in the new information you wish to edit, and select the tournament types, game types, or speed of the tournament from the drop-down menus and then click save.
Alternatively, you can also delete a report, refresh it, or export an excel file for your reference.
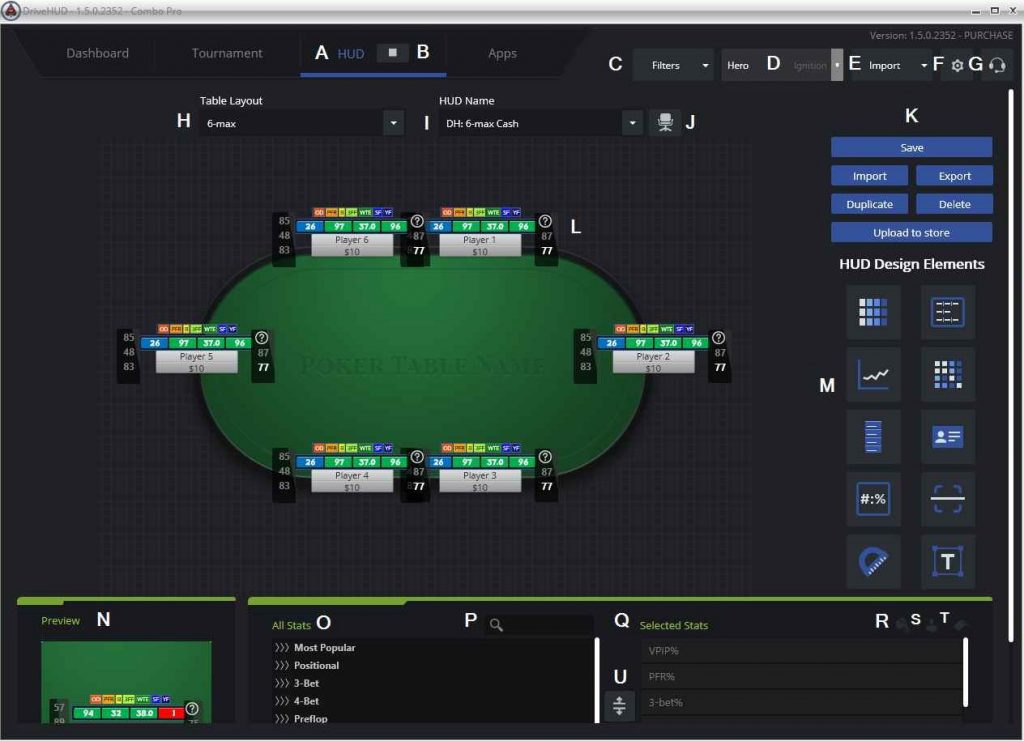
A) HUD tab – This is where you can design your own HUD or select your default HUD for each game type, poker site, and table type you’ll be playing.
B) HUD Run Button – This will default to RUN. Click the Stop button to stop the HUD, or if it’s already stopped, the PLAY (or run) button to engage and run the HUD. If the HUD is running, you will see the STOP button by default.
C) Filters – Click this drop-down to create a custom filter, or load a quick date filter from the drop-down. Once filters are created, they are shown between the Reports section of DriveHUD and the hand grid section.
D) Selected Player – Click here to select which player’s stats you want to load in the Dashboard. You must have a selected player in order to show hand data. You can select from the drop-down list, or begin typing in a player name to locate that player. Player name HERO is used in DriveHUD by default for your player name. To Change this, go to the settings menu (Letter F).
E) Import – Click here to import hand histories that DriveHUD supports. You can import by file or by folder. You can also import by file and click CTRL + left mouse click to select multiple files.
F) Setting Menu – The settings menu contains options such as General options, Site settings, Currency settings, Rakeback and Bonus settings, as well as Upgrade and support form options. If you need to send a log file to support, you go to the settings menu and the support tab. Fill out your e-mail and issue, and attach a log file (selected by default).
G) Support Button – Click this to send a message to support, access the online manual, the support forums, or the knowledge base. By default, if you send a message to support it will attach your logs. Only click the Send Advanced Log checkbox if you’ve been asked by support to send your advanced logging information.
H) HUD Name Pull Down – This is the name that is given to the HUD profile. When you save a new HUD, you’ll be asked to name it. When you do, it will then show up on this list for you to select, edit, delete, or export.
I) Table Layout Pull Down – This is the number of seats for the HUD type you’re selecting or looking to create.
J) Preferred Seating Button – Click on this to load the preferred seat settings for each poker site. Each poker site that you’d like to have preferred seating seat needs to be set in the Config -> Site Settings options. For more on setting preferred seating, see this knowledge base article – Set Preferred Seating.
K) Save and Import Buttons – Use the Save button to save your current layout to DriveHUD. You’ll be asked for a name, or you can overwrite an existing HUD layout. Delete will allow you to delete the current HUD profile. Import will allow you to import a DriveHUD layout from another user or one you’ve created on another system. Export will allow you to export your layout and share the HUD with others. Duplicate will copy all of the same settings you have for your currently selected HUD onto a new table size format of your choice. And lastly, Upload to store will allow you to upload your own HUD to the HUD store. Here, you can let others download it for free or for a fee.
L) HUD and Table Layout Designer – This where you can position the HUD where you’d like it to default to on startup, and see your current HUD design.
M) HUD Design Elements – These are the drag and drop elements you use to create a custom HUD. The following is an overview of each button:
Line Bar Graph – This is a line bar graph pop-up that can be added to nearly any stat by simply dragging and dropping it to a stat in the HUD designer window (L).
Text Box – A text box element can be added to your HUD by dragging and dropping this element. The size of the text is dependent on how big you make the text box once added to the HUD designer window (L). Simply click on the text box and drag one of the four corners out or in to increase or decrease the size of the text.
Graph – A linear graph can be added to any stat by dragging and dropping this element to a stat. The graph will display current session graphing for the stat you drag the element to, and it will also show the last 4 showdown hands for that player.
Tilt Meter – Drag and drop a tilt meter indicator to any space in the HUD designer Window. The Tilt meter will light up and show how likely it is that a player is beginning to tilt or in full tilt.
Player Profile Icon – This element will display an icon based on what type of player you’re facing. These icons and player types are set in the player profile editor (S).
4-Stat DH Box – Drag and drop this element to add a 4 stat solid HUD element to your HUD. The 4 stat box is a larger standout design for featured HUD stats that you want to be able to see quickly and easily.
Heat Map – Heat maps can be dragged to any HUD stat and also to any pop-up stat. Simple drag and drop the heat map until the stat is highlighted in white and then drop onto the stat.
Break Line – Use this element to create breaks between sets of stats in pop-up stat windows. Drag and drop the line between any two sets of stats in a HUD pop-up.
Plain Stat Box – Drag and drop this to create a HUD box that can be used to select and add new stats to your HUD. Each plain stat box you drag to your HUD will have a separate set of HUD stats that will be shown in the Selected stats window (Q). Highlight the plain stat box, and then drag and drop stats from the HUD stats window (O) to the Selected Stats window (Q) to populate and add new stats to your plain stat box.
Bumper Stickers – Bumper stickers will appear when an event that matches the set criteria is met. Bumper stickers can be placed anywhere on your HUD design element but will appear invisible on the table until a criterion is met for your bumper stickers. The bumper sticker can be deleted, added and edited from the bumper sticker editor (T).
N) Preview Window – This is a simple example of what your HUD will look like on a table. You can mouse over the elements to get an idea of spacing and design.
O) HUD Stats – These are where all of the available stats you can add to your HUD are. Click on any main stat section title to open the subset of the available stats for that section. To add a new stat to your HUD, simply drag and drop it into the Selected Stats section (section Q). To remove a stat, drag and drop it back to the HUD stats section.
P) Search HUD Stats – Here, you can quickly do a search of all available HUD stats. This is especially useful when you already know what stats you are looking for.
Q) Selected Stats – This section stores your selected stats for your HUD. To remove any stat, simply drag and drop it over to the HUD stats window (section S).
R) Stats Color Range & Font Editor – This section allows you to create a color range for each of your stats you’ve selected for your HUD. Click on the stat on the left-hand side window to edit it. Then enter a stat range for each of the sections (up to 5 sections), to create a color. If the stat falls between that range, it will turn your selected color in your HUD in real time. You can also edit and change the font, the size, bold, italicize and the minimum sample that is needed for the stat to display on your HUD.
S) Player Profile Editor – This section allows you to create player profiles that will appear on your HUD if that player falls between the selected stat ranges that are listed. You can edit any of the default player type profiles, or create one of your own.
T) Bumper Sticker Editor (badge system) – This section allows you to create or edit any bumper sticker you’d like to appear on a table for your HUD. A bumper sticker is any sticky note you’d like to appear on your HUD that will alert you to some exploitable tendency or pattern of play your opponent is doing. You can
U) Line Insert – Click on this to insert a new line indicator into your HUD. It will show a small blank line between your stats. This will create a line break in your HUD. To remove this line break, drag and drop it back into the HUD Stats section.
If your HUD is out of position, or you’d like to move it to a different location while you’re live on a table, simply right click and hold your right mouse button down and drag the HUD to the new position you’d like it to be and release.
To import a HUD layout into DriveHUD do the following. Please note that DriveHUD can only import HUD layouts that are created with DriveHUD.
From the HUD tab in DriveHUD, click in the IMPORT button.
A pop-up will come up asking you which file you’d like to import. Select the .XML DriveHUD file you’d like to import.
Click OPEN.
Your HUD will be added under the correct GAME TYPE and HUD NAME it was created for. To use this HUD select it from the drop down list at the top of the HUD page.
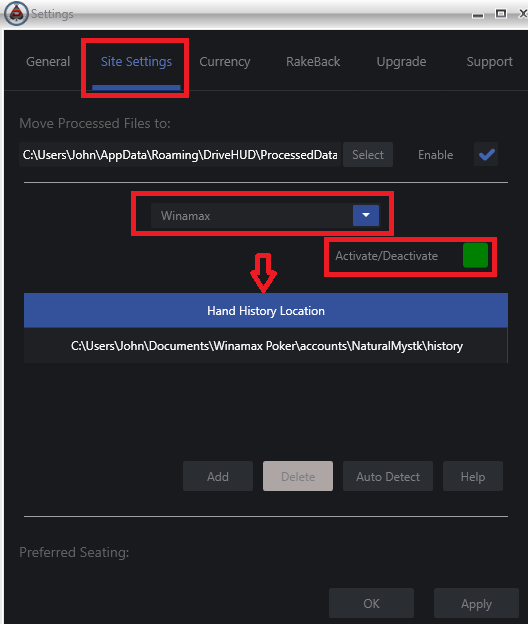
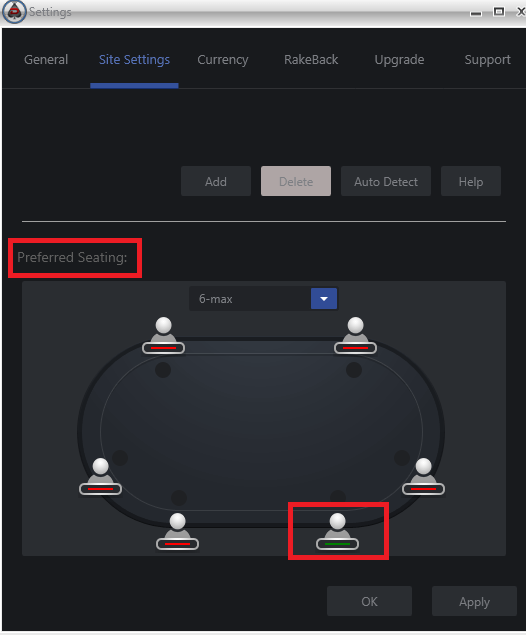
If you’d like to set preferred seating in DriveHUD, you’ll need to do the following:
Set preferred seating in your poker client. Most sites have a config or settings section that has options to set preferred seating.
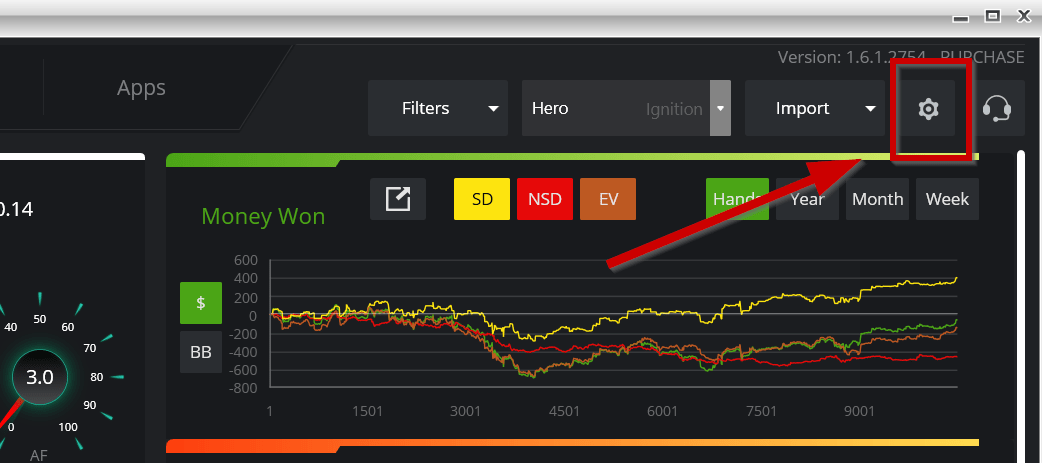
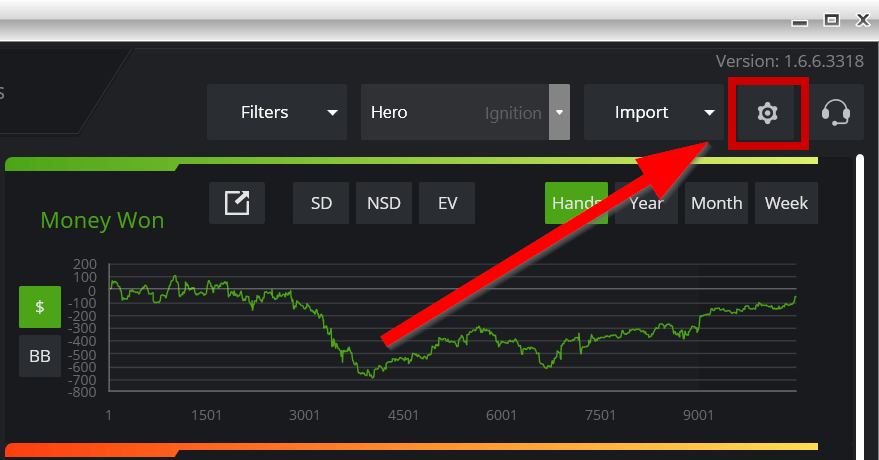
In DriveHUD click on the settings button located at the top right hand side of DriveHUD.
When the settings window pop-ups, click on SITE SETTINGS -> Select a poker site you’d like to set from the drop down list -> Click on a seat position, which will turn it GREEN. If seat is not set, it will show as RED.
NOTE: Makes sure you set a seat for each table type that you want to play on.
Creating a custom HUD is easy and straight forward in DriveHUD. The following video tutorial will walk you through the process. Below is a tutorial video on how to create a new custom hud, or editing an existing one on versions v1.0.8.1052+.
For more information on HUD creation, please see the online manual:
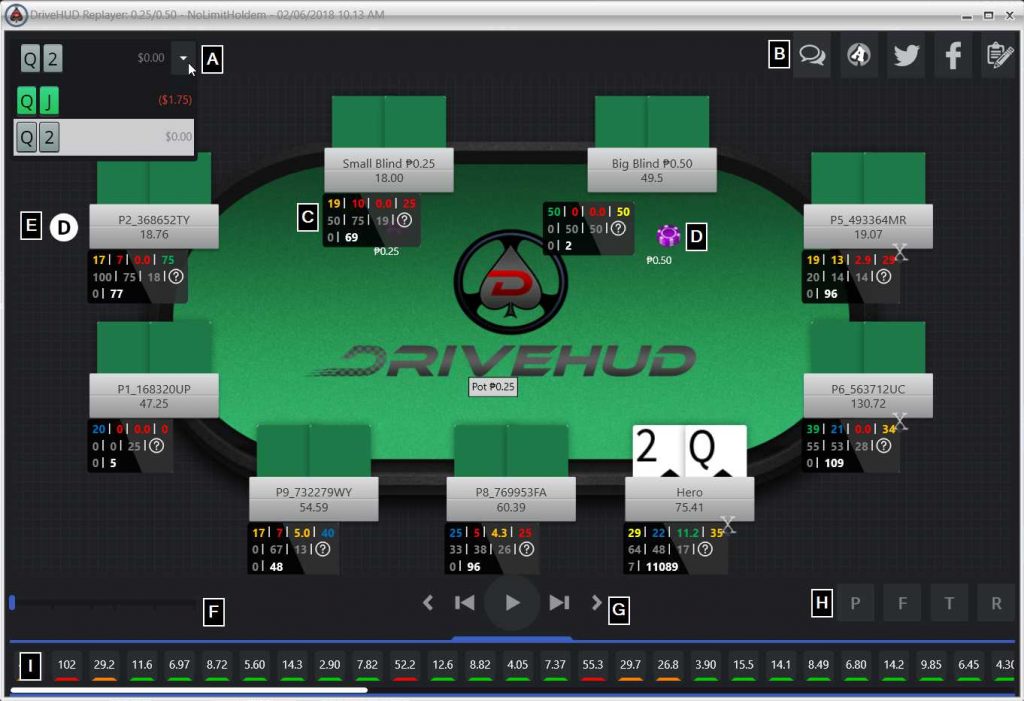
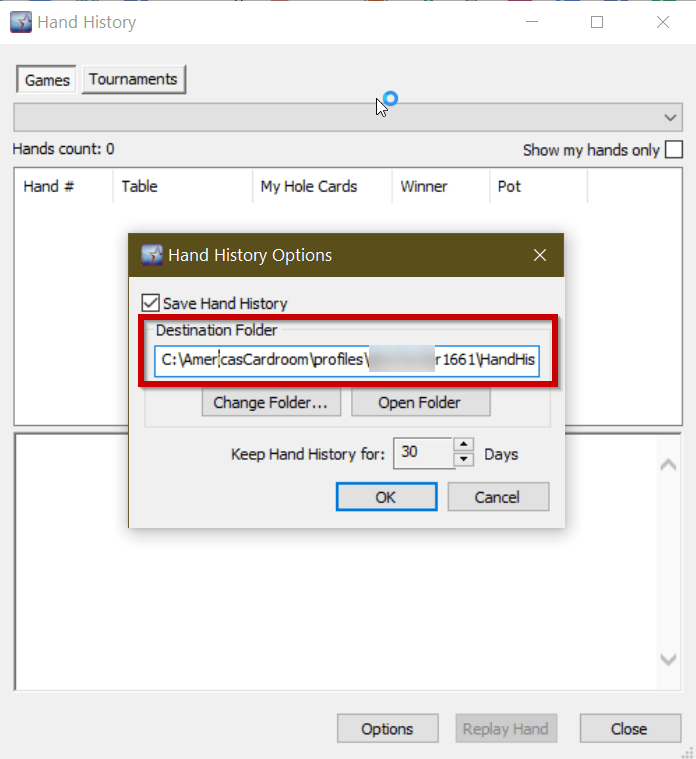
The hand replayer for DriveHUD can be invoked by either double clicking on any hand that is in the bottom hand grid section, or right-clicking, and selecting replay hand from the menu.
A) Recent Hand List – From the drop down you can quickly go back and view/replay hands you’ve launched during this session of the replayer. Just select the hand and it will load in the replayer.
B) Social Media Export & Notes – From here you can export the hand you’re replaying to a social media or poker forum. From left to right – poker forum export, ace poker solutions forums, Twitter export, facebook, and note. To add a note about this hand just click on the furthest icon with the paper and pencil and you can write a note about the hand. An icon will then show up in the bottom hands’ grid of DriveHUD anytime the hand is displayed.
C) HUD Stats – This is an overview of the stats your opponent had for the current session or any historical stats you had for them. Mouse over any stat to see what the numbers represent.
D) Bet Amounts – As you replay your hand, chips will be placed on the poker table to represent and show the current bet by the active player.
E) Dealer Button – This is the current position of the player who is the dealer/button for the hand you’re replaying.
F) Replayer Position Slider – This is the current position that the hand is in during your review/replay. You can move the slider to the left or to the right to quickly move to another position in the hand.
G) Hand Replayer Controls – This allows you to play the hand and view it, skip through street by street or go straight to the beginning or end of the hand. The big button in the middle with the play symbol will play the hand at an exact pace. The first button to the right will move all the way to the end of the hand, while the second button from the right will move one action at a time. Conversely on the other side going to the left and out from the play button will go to the beginning of the hand, and the final button on the left will move one action backward for each click.
H) Replayer Steet Buttons – Each of these buttons will skip to a specific street in the hand. The P, will forward to action pre-flop, the F, will go to the flop. The T, will go to the turn, and the R, will go to the river.
I) Big Pots Session Buttons – Each hand you load will also load all of the biggest hands you played for the session related to that hand. It will list these at the bottom of the replayer. All hands will be listed in big blinds. The biggest hands will be listed in RED, the medium size pots will be listed in orange, and small pots will be listed in green. Any pot that is 7 BB’s or larger that you were involved in will be listed here. You can click on any of them to load them in the replayer and review them.
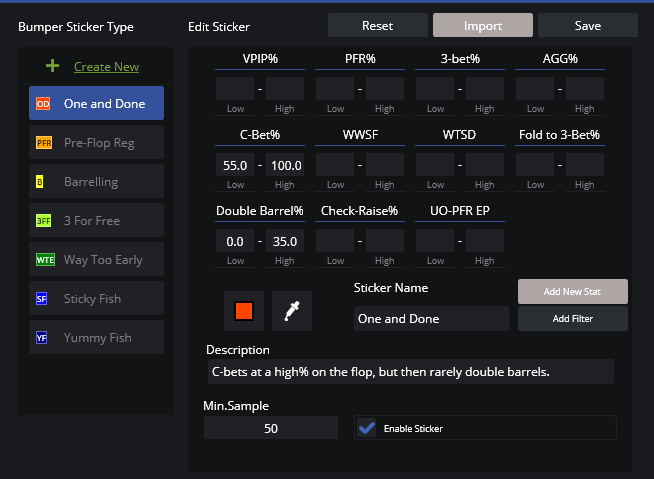
Bumper stickers are DriveHUD’s internal “badge type” system that identifies certain player tendencies and labels them so you can easily spot them while playing. Below is an overview of how to edit the existing default bumper stickers, or create your own.
To edit or create your own bumper sticker, click on the sticker icon located at the bottom right-hand corner of the HUD tab in DriveHUD. You’ll get the bumper sticker pop-up which looks like this following:
To create a new bumper sticker simply:
Click on CREATE NEW at the top.
Enter a name for your bumper sticker in the sticker name text box. DriveHUD will use the first letter of each word, up to 3 words, to create the bumper sticker abbreviation.
Enter a description for your new bumper sticker that will appear on mouseover of the sticker. This will help explain what the sticker is in case you forget.
Choose a color for the sticker by clicking on the color dropper icon.
Enter some stat ranges that will help trigger this bumper sticker and/or Filters. To add a filter click on the Add Filter button. You can create a filter and click ok when you’re done and it will appear in the bumper sticker screen. To remove the filter, click on the X icon at the top right of the listed filter.
When you are done, click SAVE. Your new bumper sticker will trigger in your HUD when an opponent has met the stat ranges and/or filters you set.
To Edit an existing bumper sticker:
Click on the bumper sticker you wish to edit on the left.
The stats will appear on the right-hand side of the screen for the selected bumper sticker.
Edit and change any of the stat ranges or add a filter.
To add a filter click on the Add Filter button. You can create a filter and click ok when you’re done and it will appear in the bumper sticker screen. To remove the filter, click on the X icon at the top right of the listed filter.
When you are done, click SAVE. Your changes will be saved to the currently selected bumper sticker and will trigger in your HUD when an opponent has met the stat ranges and/or filters you set.
This is an overview of the poker equity calculator in DriveHUD.
A) Clear Button – Resets the currently selected board (section B), and hand ranges (section F).
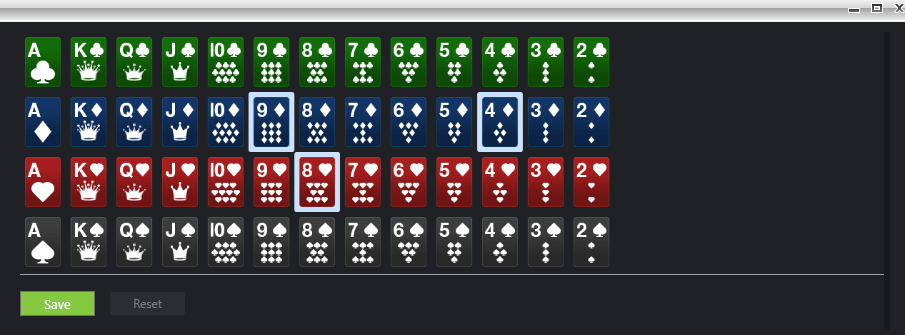
B) Poker Board – The current set of cards selected to run an equity calculation on. To change a card left click on any part of the board and the card selector will pop up like below:
Right click on any set of up to 5 cards and click save to add them to the poker board. To reset all of the cards, click the reset button.
C) Player name – This will display the current players name if you launched an equity calculation from a hand grid (see). Otherwise this will always say player.
D) Hand Range Button – Click on this to load the card selector (as seen below). You must select two cards from the board, or select a range of hands by clicking on the preflop button as seen below:
————————————-
D1) Hand Range Grid – Left click on any hand (turns purple) to add it to your hand range for the selected player, or left click and drag your mouse across the grid to add several hands at once. To turn off or remove a hand, double left click on the hand.
D2) Cards/Preflop Selector Buttons – To load a specific two card hand into the poker equity calculator, click on the Cards button. Select the preflop button to come back to this hand grid.
D3) Weighted Hand Range – Right click on any hand to select how often someone will have this particular hand in their hand range. After you select a percentage, the percentage will show up on the hand grid.
D4) Quick Range Buttons – To add a quick group of hands to your range, select the pre-defined hand range button. This will bring up a pop-up with a pre-defined set of ranges for specific situations like 3-bet pots, limped pots, open raised pots by position and cold calling range. See – for more information.
D5) Hand Range Slider – Slide this left or right to add hands to the grid quickly based on top or bottom of someone’s hand range. The further to the left you move the slider, the further to the top of their range you will get. The further to the right will expand their range into the bottom of their hand range.
D6) Combo Selector – Right click on any combination of suits for the specific hand you’ve selected to remove or add back in that hand combination. Simply right click on any hand to remove it (turns darker grey), or click on it again to add it back in (turns lighter grey). By default they are all selected (light grey).
D7) Save/Reset Buttons – Once you’re done selecting your hand range, click on the save button. You can click on reset to reset the entire hand range grid and start over.
———————————–
E) Bluff % Button – Enter the size of the current pot and the amount you bet or would like to bet to calculate your break even bluffing percentage. This takes the size of the pot, and your current equity in the hand to display how often you’d need someone to fold to break even.
F) Displayed Hand Range – This is where the currently selected hand range will display. To quickly remove a hand, click on the tiny X in the upper right hand corner of the hand. Alternatively you can click on the hand range button (section D), and also remove or add more hands.
G) Calculate Equity – Once you have all of your input selected for your equity calculation, click on the Calculate equity button to run that actual calculation.
H) Equity Results – This is where you’ll see a line bar that will display your equity results for your currently selected hand.
I) Export Data – Click here to export your equity calculation and/or hand history to a forum friendly format that will post on most poker forums. See Below:
You can select to export the calculation only, the calculation plus the hand history, or just the hand history. This will copy to your read buffer and can be posted into most poker forums by right clicking and selecting paste, or CTRL+V.
J) Reset All Button – Click here and this will reset your entire equity calculation so you can begin again.
K) Board Buttons – If you loaded a hand from a hand grid, you can select which street you’d like to load the calculation from. Select pre-flop, flop, turn or river. If you have auto generate opponent hand range selected, the hand ranges of your opponent will change based on the street selected.
L) Auto Generate Hand Range – This is selected on by default. When checked, this will automatically assign a range to your opponent(s) based on how the hand was played preflop, and post flop. You can edit and change this range by selecting the range button (see section D) for the player you wish to change.
M) Close Window X – Click on the X at the top right of the screen to close the equity calculator and re-load the poker gauges and the poker graphs.
DriveHUD offers several player type icon profiles (default) that will display as you gain information on your opponents and build history with them. You can view, add, and edit the existing profiles by clicking on the player type icon at the bottom right-hand corner of the HUD tab right by the selected stats section.
Player profiles are based on the stats you’ve accumulated on your opponent. The more stats you have on your opponent, the more accurate the profile will become. Profiles are a general overview of what kind of player you’re facing. They should never be considered absolute but should give you a quick visual representation of how your opponent is likely to play poker. Below is an overview of the different default player profiles included in DriveHUD:
NIT – This kind of player plays tight pre-flop, doesn’t 3-bet too much, and generally only plays very strong hands. They can play aggressive post flop, or sometimes passive. But generally, if you’re in a pot with them, they will have started with a top tier premium starting hand.
Fish – This is one of the easiest types of players to play against. They will play too many hands pre-flop, play their hands passively post flop, and go too far with mediocre hands they should have folded earlier in the hand.
Standard Reg – This is a decent poker player who is an experienced online poker player. They generally play a solid starting range of hands but know a bit about when and how to mix up their starting ranges. They play pretty decent and aggressive postflop and don’t make a ton of mistakes. They will generally play what is considered a TAG (tight-aggressive) style of play.
Tight Reg – This is a similar kind of player to the Standard Regular, but they will generally play a little tighter of a range pre-flop, and they will fold slightly more hands than they should post flop because of their slightly risk-averse nature. They play more of an ABC style of play that is right out of the poker book.
Bad LAG – This is generally someone who likes to plays a few more starting hands than they probably should, and plays fairly aggressive post flop. They tend to have a lot of holes in their post-flop game though and make a lot of post-flop mistakes. They can sometimes either be too passive in the wrong spots post flop, and too aggressive in others.
Tricky LAG – This is generally the player you want to avoid the most. They play a good amount of starting hands and know how to balance their ranges pre-flop and post flop. They are thinking players that can generally think one step ahead of most players. They know when they can get better hands to fold and can maximize the value of their better hands extremely well.
Whale – These are players that are playing way too many hands post flop, and generally just makes tons of post flop mistakes. They will go too far with hands they shouldn’t, and generally have a hard time folding post flop. They don’t bluff very often and if they do it usually won’t be in the right spots.
Nutball – The name kind of says it all. These players are really unpredictable, and generally just love to gamble it up. They will play too many hands pre-flop and do some really odd unpredictable things post flop. They make tons of pre-flop and post-flop mistakes.
You can also create your own player type profiles and use some of the existing icons that are in DriveHUD if you click CREATE NEW at the top of the player profile screen and then click LOAD to select one of the default icons. You can also import your own custom icon for a player profile you’ve created, but it must be 24×24 pixels.
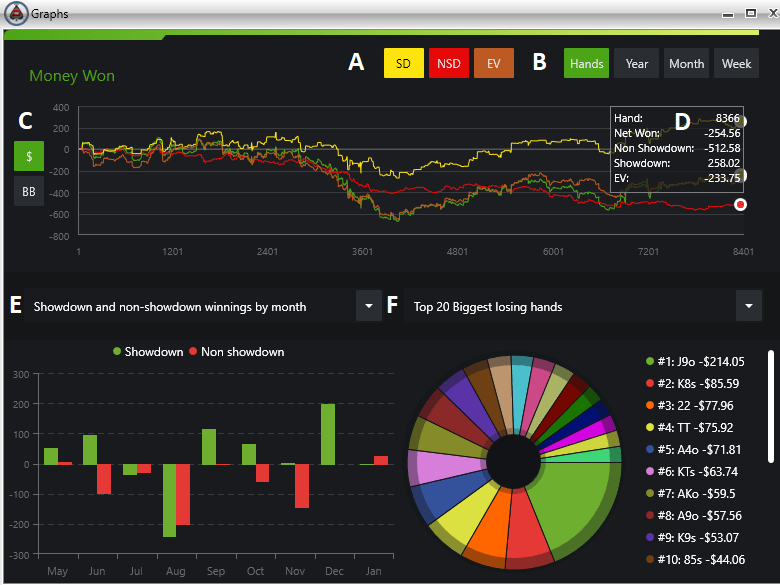
A) Pop-out button – When you click on this button, the graphs will create a pop-out screen with several more graphing options.
B) Graphing options – When you click on any of the graphing options, it will display or remove them from the graph. SD = Showdown winnings, NSD = Non-showdown winnings, EV = Expected value when all-in.
C) X-axis Graphing options – You can select which data parameters display on the X-axis of your graph by four options, Hands, year, month, and week.
D) Y-axis Graphing options – You can have your Y-axis data displayed by total dollars won, or by big blinds.
E) Graph summary – If you mouse over any place on the graph, you’ll see a summary of each line of data you have selected for your graph.
F) BB/100 Graph – This graph will display your BB/100 winrate.
G) X-axis options for bb/100 – You can display your data based on total number of hands, year. month, or week.
A) Graphing options – You can add the following data points to your graph by clicking on the box next to each. ITM% – In the money percentage is the percent of the time you made the money in a tournament. ROI% – Return on Investment percentage is an overall percent that you profited from tournament play. Your total amount paid into tournaments divided by the total profit you made. $ – Total dollars won from tournament play. Luck – The total percentage of the time you’ve been all-in, and survived in a tournament.
B) X-axis options – You can display your line bar graph by year, month, or week.
C) Graph plot points – You can mouse over any point in the graph to get the data related to that line bar graph.
A) Graphing options – When you click on any of the graphing options, it will display or remove them from the graph. SD = Showdown winnings, NSD = Non-showdown winnings, EV = Expected value when all-in.
B) X-axis Graphing options – You can select which data parameters display on the X-axis of your graph by four options, Hands, year, month, and week.
C) Y-axis Graphing options – You can have your Y-axis data displayed by total dollars won, or by big blinds.
D) Graph summary – If you mouse over any place on the graph, you’ll see a summary of each line of data you have selected for your graph.
E) Line bar graphs – From this drop down you can select several graphing options to display. Showdown and non-showdown winnings by month, which is the total amount of money you’ve won at showdown compared to winning without showdown. Showdown and non-showdown winnings by year, which is the same thing, but displayed by year. Money won by cash game type, which will graph how much you’ve won at the different poker games you play. Money won by tournament game type, which will graph how much you’ve won by each tournament buy-in and type. EV difference to realized EV by month, which will display what your all-in EV should be versus what your actual realized EV was.
F) Pie chart graphs – From this drop down you can select several pie chart styles graphs. Top 20 biggest losing hands shows the biggest losing hands you have in order or worst loss. Top 20 winning hands, is the same thing, but for the hands you’ve won the most with. Money won by position will display how much you’ve won from each general position at the table. Bb/100 by time of day will show you when your most profitable hours of play are.
You must configure party poker to save hand histories to a designated directory on your hard drive. This has to be set up in order for DriveHUD to properly import, track hands, and launch a HUD. Do the following:
From the PartyPoker lobby, select on Options > Advanced.
Ensure that hand history logs are being stored locally on the machine
Click Save to save the settings.
Saved Hand Location Setup
Once you’ve set Party Poker to save the hand history location, you must set this same directory in setup on DriveHUD. DriveHUD will auto-detect your hand history folder location on startup, but we suggest checking and ensuring that it is set correctly. To do so do the following:
Click on the SETTINGS button icon at the top right-hand side of DriveHUD.
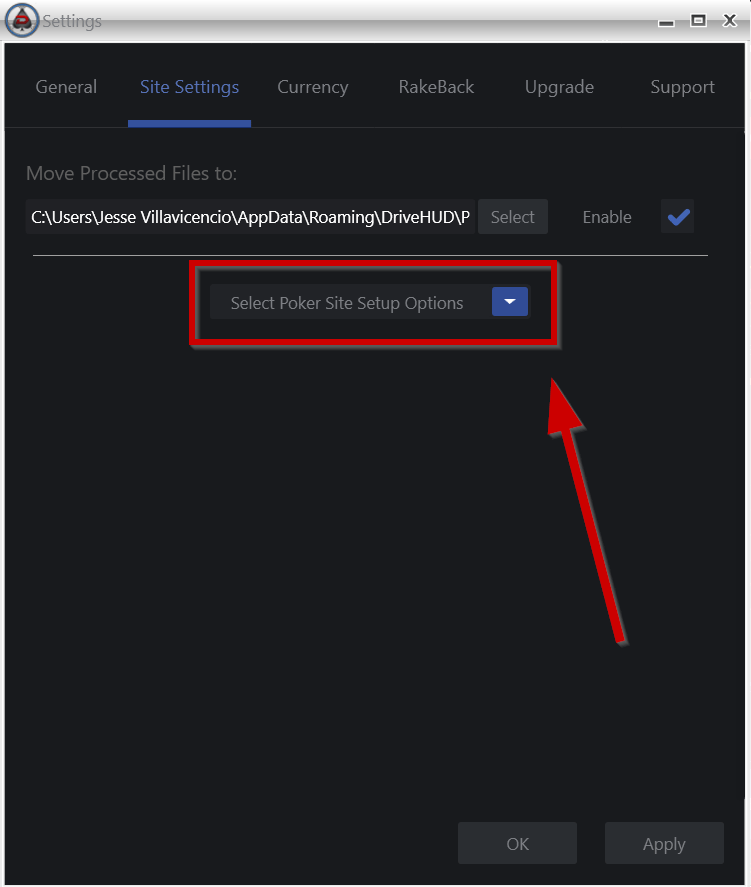
Click on the SITE SETTINGS tab in the settings window.
From the drop-down menu shown below, select – Party Poker.
4. Make sure you have a hand history location showing, similar to above, or click the AUTO DETECT button to add your hand history folder location on Party Poker.
5. Click on APPLY. Click on OK.
Language
Partypoker must be configured to use the English language. DriveHUD will not run or work properly if Party Poker is installed in a different language. If you have it installed in another language, we recommend uninstalling, and re-installing in English.
Preferred Seating
If you wish to have a preferred seating set, you must do the following in Party Poker:
1. From the party poker lobby, select Options –> Advanced -> Table Options.
2. Check the “Use preferred seating” checkbox.
3. Select the table type(s) you play by clicking the number shown on the table.
4. Click your preferred seat for each table type and then Save.
Once you’ve done this on Party Poker, set the same seat location in DriveHUD by doing the following:
Set preferred seating in your poker client. Most sites have a config or settings section that has options to set preferred seating.
In DriveHUD click on the settings button located at the top right-hand side of DriveHUD.
When the settings window pop-ups, click on SITE SETTINGS -> Select a poker site you’d like to set from the drop-down list -> Click on a seat position, which will turn it GREEN. If the seat is not set, it will show as RED.
NOTE: Makes sure you set a seat for each table type that you want to play on.
DriveHUD will auto-detect your hand history folder location on startup, but we suggest checking and ensuring that it is set correctly. To do so, do the following:
Click on the SETTINGS button icon at the top right-hand side of DriveHUD.
Click on the SITE SETTINGS tab in the settings window.
From the drop-down menu shown below, select – Winamax
4. Make sure you have a hand history location showing, or click the AUTO DETECT button to add your hand history folder location for Winamax poker.
5. Click on APPLY. Click on OK.
Preferred Seating Setup (step 1)
To set preferred seating for Winamax Poker, do the following:
In the poker client, click on options at the top. Then click on GAME, click on OPTIONS. You’ll then see the preferred seating option drop-down menu.
Then set the location you wish to have your player and hud position to display at your tables.
Set seat numbers in DriveHUD (Step 2)
Once the above is set, from the DriveHUD dashboard, click on the settings menu button (top right of DriveHUD):
Then from the settings menu, click on SITE SETTINGS. Make sure Winamax is selected from the drop-down menu. Scroll down until you see Preferred Seating.
Select the table types you want preferred seating for from the pull-down menu. Then select the same seat location you selected in your Winamax network poker client.
You must configure the iPoker client to save hand histories to your hard drive in order for DriveHUD to import your hands and display a HUD.
Step 1
To save your Hand Histories on iPoker, do the following:
From the iPoker lobby, click on My Account -> Settings and go to the General section.
Check Store Hand History Locally.
Please note the default location where iPoker is saving your hand histories.
The default location is %appdata%\Local\<iPoker Client>\data\<Screenname>\History\Data
(where <iPoker Client> is the name of the iPoker client you have installed and <Screenname> is your screenname in the iPoker client)
Step 2
Saved Hand Location Setup
Once you’ve set iPoker to save the hand history location, you must set this same directory in setup on DriveHUD. DriveHUD will auto-detect your hand history folder location on startup, but we suggest checking and ensuring that it is set correctly. To do so do the following:
Click on the SETTINGS button icon at the top right-hand side of DriveHUD.
Click on the SITE SETTINGS tab in the settings window.
From the drop-down menu shown below, select – iPoker.
4. Make sure you have a hand history location showing, similar to above, or click the AUTO DETECT button to add your hand history folder location on iPoker
5. Click on APPLY. Click on OK.
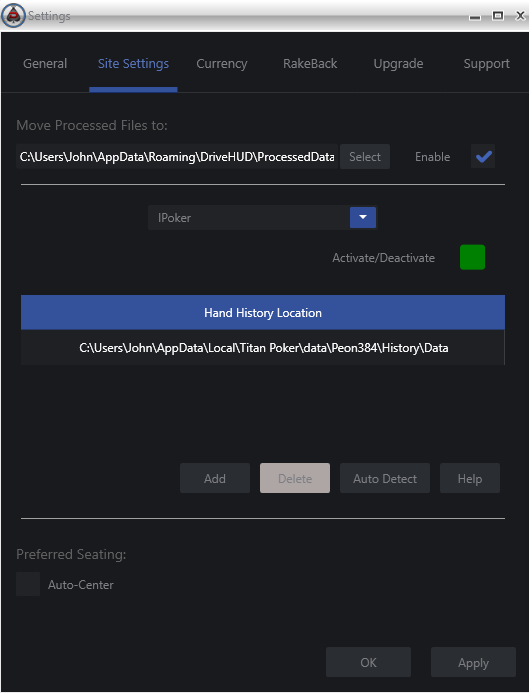
Important Additional Settings
Auto Center (Preferred Seating)
You might choose to use the Auto Center option in your iPoker client (so that you are always placed in the bottom seat at every table). To configure this, do the following:
1. From the iPoker lobby, click My Account > Settings and select the Table section
2. Make sure Auto center my seat is enabled
3. Enable Auto Center in DriveHUD by clicking on Settings -> Site Settings, and then checking the Auto Center option towards to bottom of the form (as seen above).
Language
The iPoker client must be installed in the English language. DriveHUD only supports English and if the iPoker client is installed in another language it will cause problems.
If you have the client installed in another language you will need to uninstall it and reinstall using English.
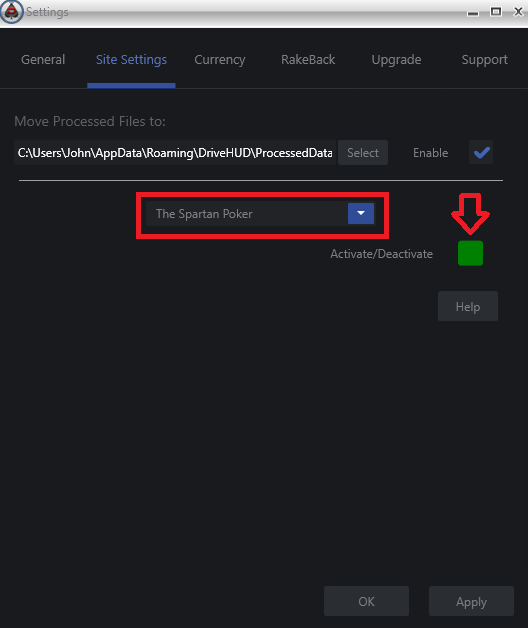
Make sure that The Spartan Poker site is enabled in Drivehud by doing the following:
1. Click on the settings button at the top right of Drivehud.
2. Click on SITE SETTINGS, and select The Spartan Poker from the site drop-down list.
3. Make sure that the Activate/Deactivate button is GREEN. If it’s not. click it until it shows as GREEN.
Launching the Spartan Poker HUD
Load up DriveHUD (we recommend doing this first).
Load up The Spartan Poker.
Just make sure the HUD start/stop button in the HUD tab at the top of DriveHUD shows a stop sign (meaning it’s running and to click it would stop it).
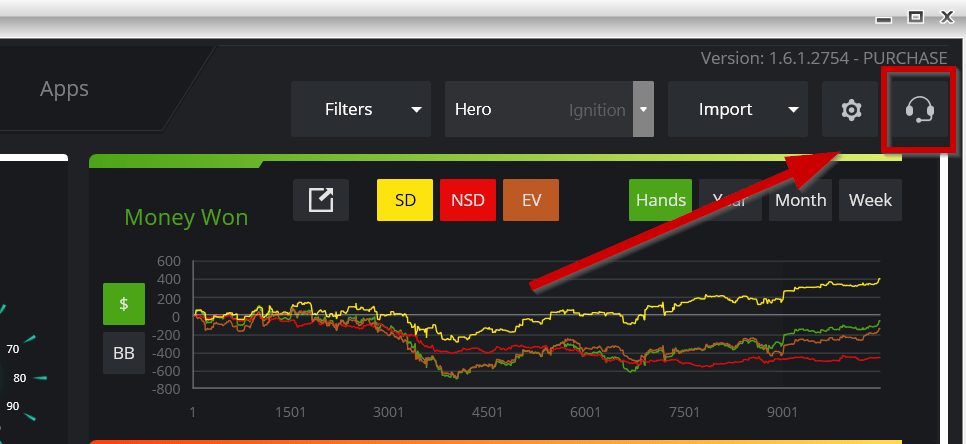
As long as that’s in place, a HUD will show up on The Spartan Poker. If you don’t have a HUD running on there for any reason, simply click on the headset/support looking icon at the top right-hand corner of DriveHUD. Put your name and e-mail and a message that you’re having difficulty and make sure to have the attach log button checked. Our support staff will respond promptly and get you up and running.
Horizon poker network site setup (Step 1) Intertops HUD
To setup DriveHUD with any of the poker sites on the horizon poker network, you first need to make sure that saving of hand histories is enabled on your poker client.
In your horizon poker client, click on options at the top. From the game options screen (seen above), click on HAND HISTORY. Make sure the save my hand histories is checked. Make note of your hand history folder location. If Drivehud doesn’t auto detect your hand history folder, you’ll need to manually set this up. Please note you’ll need to have played at least one hand of poker for a hand history location to have been created.
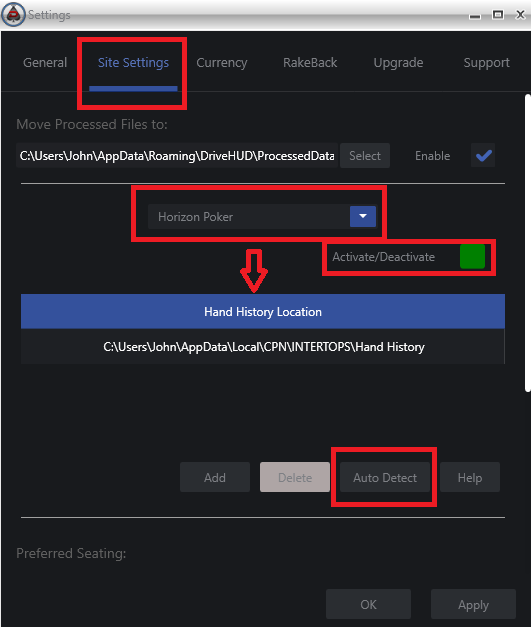
DriveHUD Saved Hand Location Setup (step 2)
DriveHUD will auto detect your hand history folder location on startup, but we suggest checking and ensuring that it is set correctly. To do so do the following:
Click on the SETTINGS button icon at the top right-hand side of DriveHUD.
Click on the SITE SETTINGS tab in the settings window.
From the drop down menu shown below, select – Horizon Poker.
4. Make sure you have a hand history location showing, the same one that was listed in Step 1 above or click the AUTO DETECT button to add your hand history folder location for horizon poker.
5. Click on APPLY. Click on OK.
Preferred Seating Setup (Step 1)
To set preferred seating for Horizon Poker (Intertops HUD, Juicy Stakes HUD), do the following:
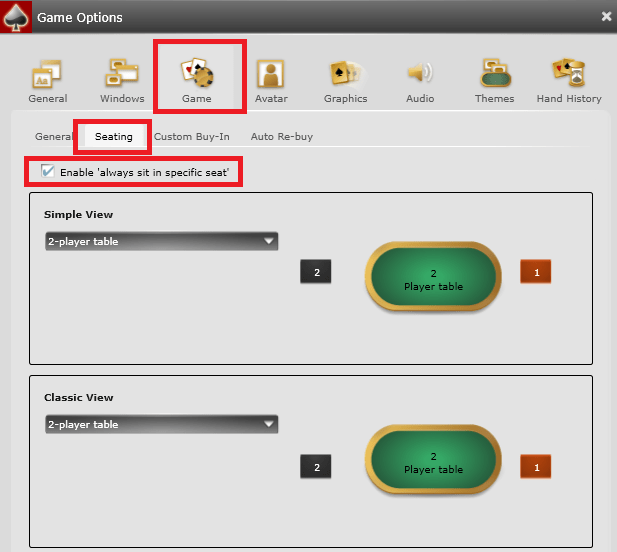
In the poker client, click on options at the top. Then from the game options menu (seen above), click on GAME, click on SEATING. Click on the check mark, that says: Enable ‘always sit in specific seat’.
Then set the seat number for each table type that you play in from the pull down menu.
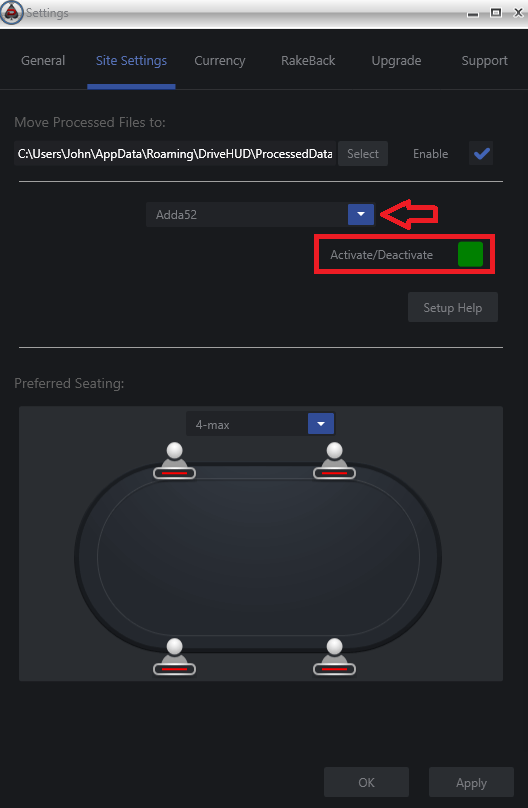
Set seat numbers in DriveHUD (Step 2)
Once the above are set, from the Drivehud dashboard, click on the settings menu button (top right of drivehud):
Then from the settings menu, click on SITE SETTINGS. Scroll down until you see Preferred Seating.
Select the table types you want preferred seating for from the pull down menu. Then select the same seat location you selected in your horizon network poker client.
Click on the SETTINGS button icon at the top right hand side of DriveHUD .
Click on the SITE SETTINGS tab in the settings window.
From the drop down menu shown below, select – Adda52.
Make sure that the Activate/Deactivate button is GREEN. If it’s RED, click on it so it’s enabled in GREEN.
5. Click on APPLY and OK.
That’s it. You need to make sure that you have Drivehud loaded before your poker client is loaded. Wait one full hand to be played before the HUD will appear.
Preferred Seating
If you wish to setup preferred seating with Drivehud, you must select your desired seat location for each table format (ie, 2-max, 4-max, 6-max, etc..), and then select the same preferred seating option on your Adda52 poker client.
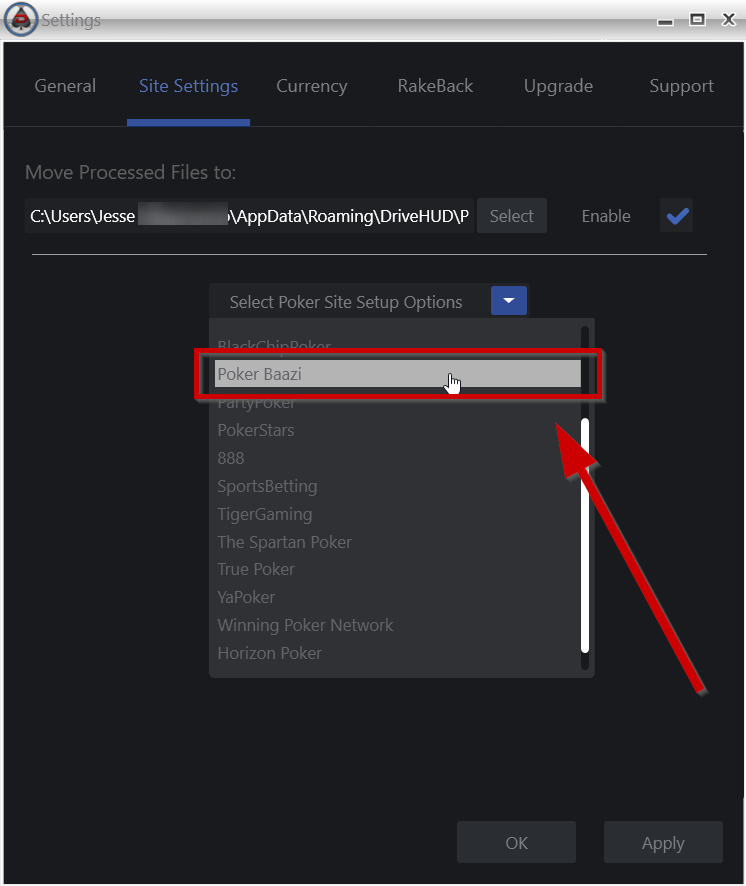
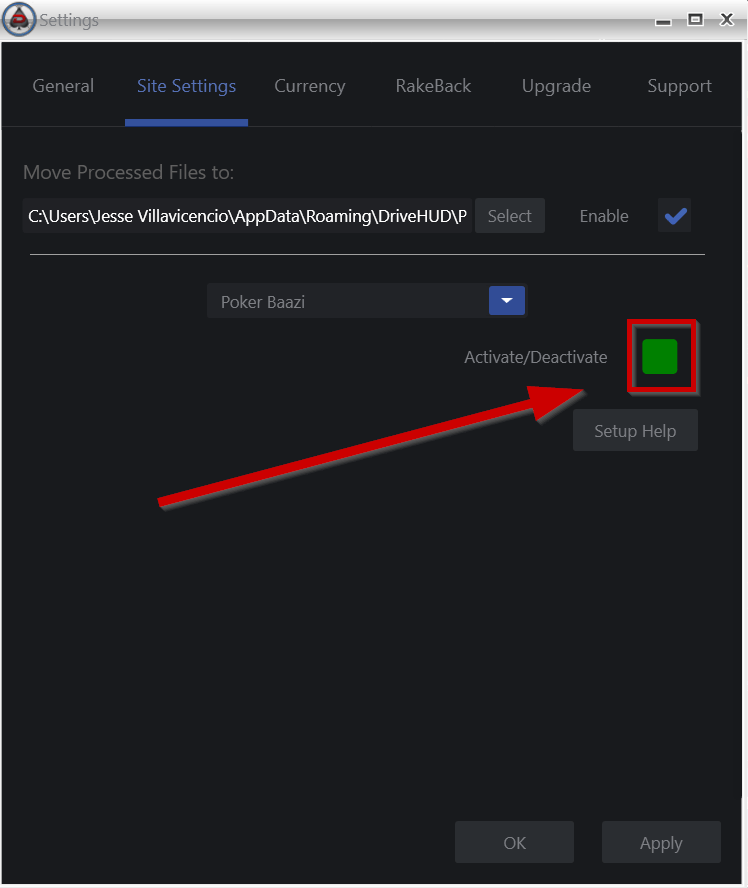
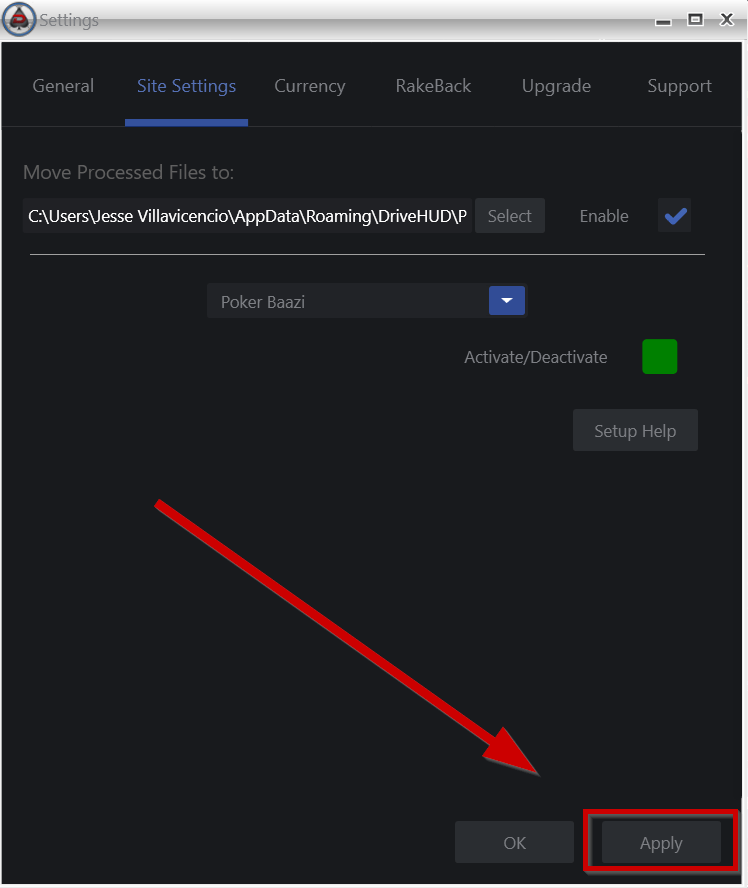
1. Click on the settings button at the top-right of DriveHUD.
2. Click on SITE SETTINGS.
3. Select PokerBaazi from the site drop-down list.
4. Make sure that the Activate/Deactivate button is GREEN. If it’s RED, click on it so it’s enabled in GREEN.
5. Click on APPLY.
That’s it. You need to make sure that you have DriveHUD loaded before your poker client is loaded. Wait for one full hand to be played before the HUD will appear.
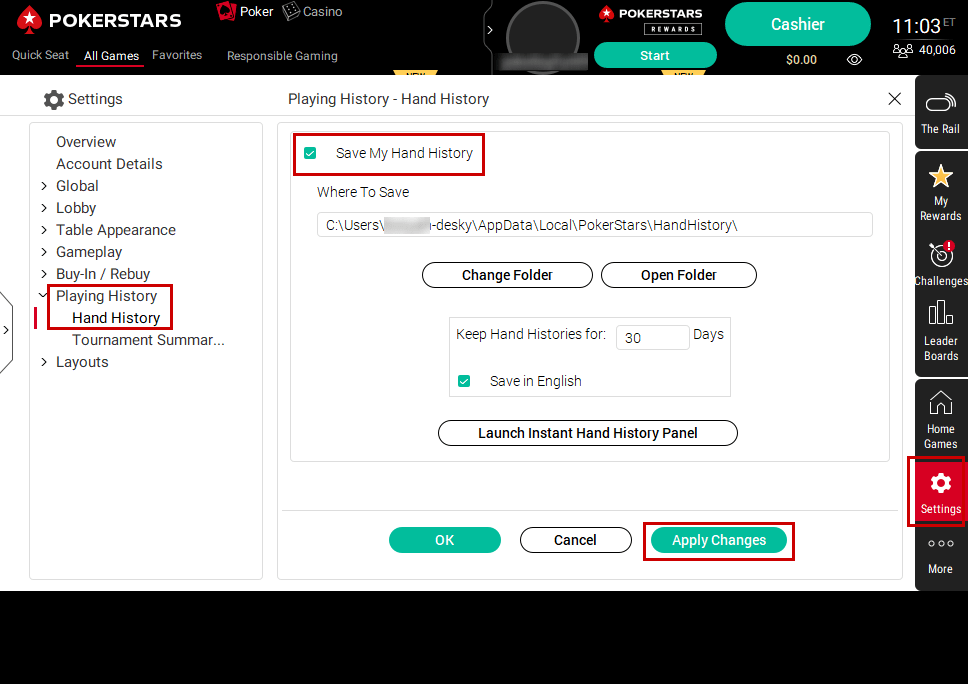
You must configure the PokerStars tools to save hand histories to a designated directory on your hard drive for both cash games and tournaments. This feature needs to be enabled on the Pokerstars client in order for DriveHUD to run and display a HUD in your poker tables. In order to enable this feature, simply do the following:
STEP 1
With the Pokerstars client open:
From the PokerStars lobby, click on Settings > Playing History > Hand History.
Check Save My Hands History.
Please note the default location where PokerStars is saving your hand histories under Where To Save.
Click OK to save the settings.
STEP 2
Setup Pokerstars hand history auto import folder
The hand history and site settings should automatically setup on its own in DriveHUD for Pokerstars. If a HUD for Pokerstars is not showing up, check your DriveHUD poker site set up by doing the following:
Click on SETTINGS in DriveHUD, located at the top right-hand side of most screens in DriveHUD.
From the settings pop-up, click on SITE SETUP.
From the drop-down menu under the move processed files to selection, select the poker site – POKERSTARS.
If there are no hand history locations listed, select AUTO DETECT.
If the hand locations look correct for your computer setup, click on APPLY at the bottom right-hand corner. If they do not show any folders or do not look correct, highlight them and click DELETE, and then click ADD. Manually add the Pokerstars hand history folder directory, which is typically located at: c:\users\(your cpu user name)\AppData\Local\PokerStars\HandHistory
STEP 3 – Change your Pokerstars tools
Setup Pokerstars Tournament summaries
You must configure the PokerStars client to save Tournament Summaries to a designated directory on your hard drive. This step is required to allow DriveHUD to import tournament results, without summaries your tournament results will be incomplete.
To save your Tournament Summaries in PokerStars, do the following:
From the PokerStars lobby, click on Options > Playing History > Tournament Summaries.
Check Save My Tournament Summaries.
Please note the default location where PokerStars is saving your hand histories under Where To Save.
Click OK to save the settings.
Step 4 – Make sure your hand histories are in English.
If your HUD is not displaying for Pokerstars.PT or a non-English Pokerstars client, it’s because DriveHUD can only read the hand histories it needs to launch the HUD in the English language.
To configure the Language in PokerStars, do the following:
From the PokerStars lobby, select Settings> Global >Language. Set ‘Play in’ to English.
If you play tournaments then you should also set the Email in language as English. Select Options > Global >Language. Set ‘EMAIL IN’ to English.
Important: You cannot run a HUD or track your games in the web based browser version of Betonline / Chico networks client. You need to download and install their PC / desktop version from their website in order to run a HUD.
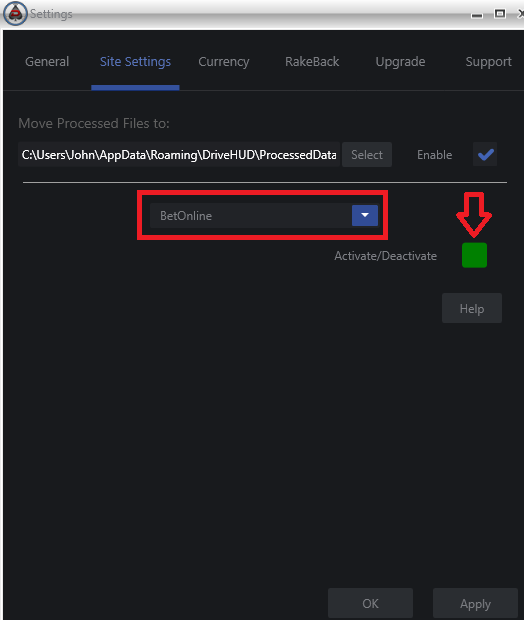
Make sure that BetOnline is enabled in DriveHUD by doing the following:
1. Click on the settings button at the top right of DriveHUD.
2. Click on SITE SETTINGS, and select BetOnline from the site drop-down list.
3. Make sure that the Activate/Deactivate button is GREEN. If it’s not. click it until it shows as GREEN.
Launching the BOL HUD
Load up DriveHUD (we recommend doing this first).
Load up BetOnline.
Just make sure the HUD start/stop button in the HUD tab at the top of DriveHUD shows a stop sign (meaning it’s running and to click it would stop it).
As long as that’s in place, a HUD will show up on BetOnline. If you don’t have a HUD running on there for any reason, simply click on the headset/support looking icon at the top right-hand corner of DriveHUD. Put your name and e-mail and a message that you’re having difficulty and make sure to have the attach log button checked. Our support staff will respond promptly and get you up and running.
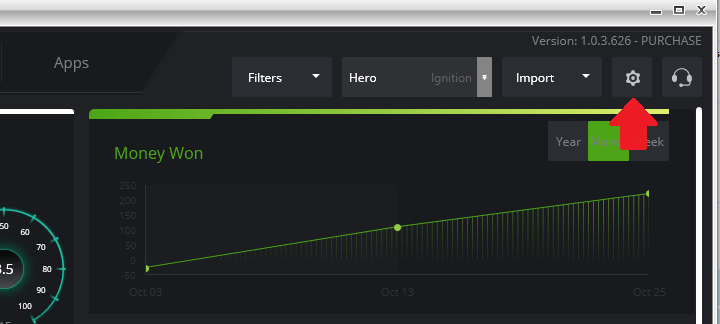
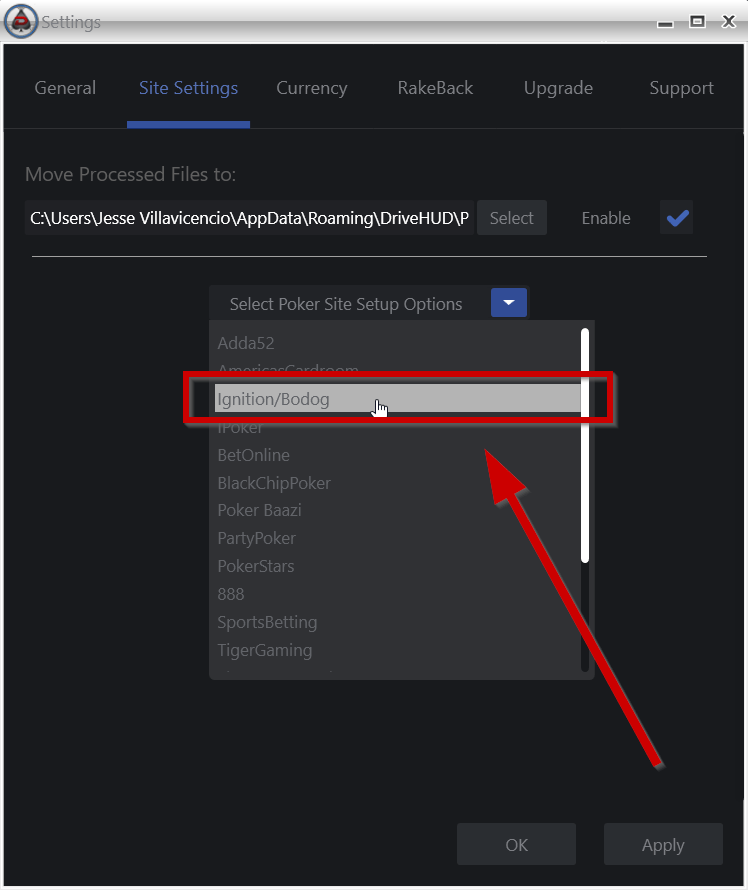
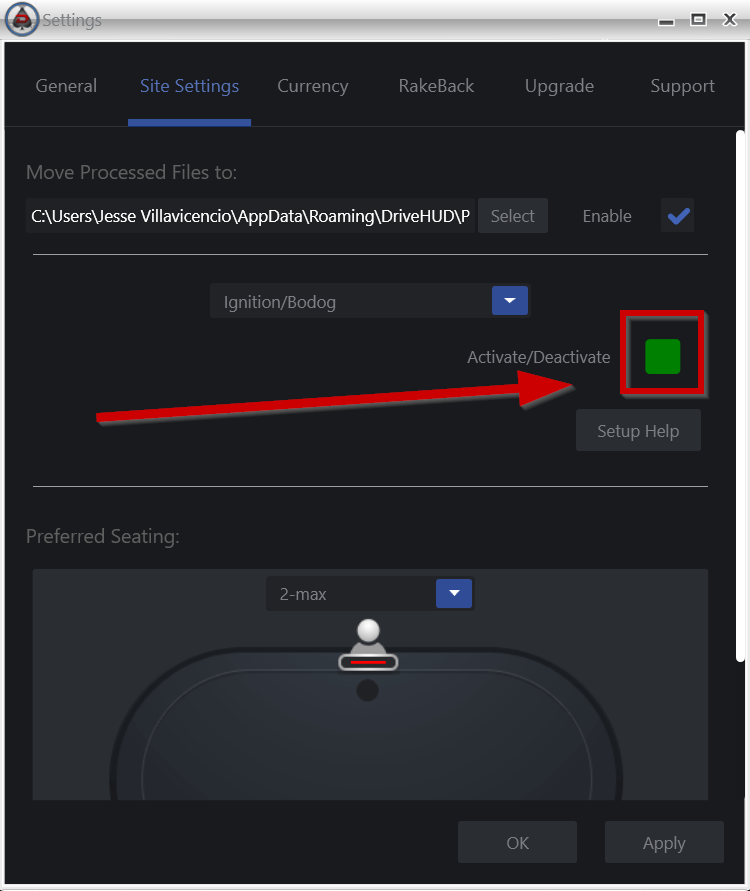
Make sure that Ignition / Bodog is enabled in DriveHUD by doing the following:
1. Click on the settings button at the top-right of DriveHUD.
2. Click on SITE SETTINGS.
3. Select Ignition/Bodog from the site drop-down list.
4. Make sure that the Activate/Deactivate button is GREEN. If it’s not. click it until it shows as GREEN.
5. Click on APPLY.
IMPORTANT NOTE: Ignition is a site that requires you wait for your table to fully load (meaning it’s shown as 100% loaded) before you load your next table. If you’re playing Zone, only load one table at the same time. Do not select the option to load 2 at once, or your tracking will not work correctly.
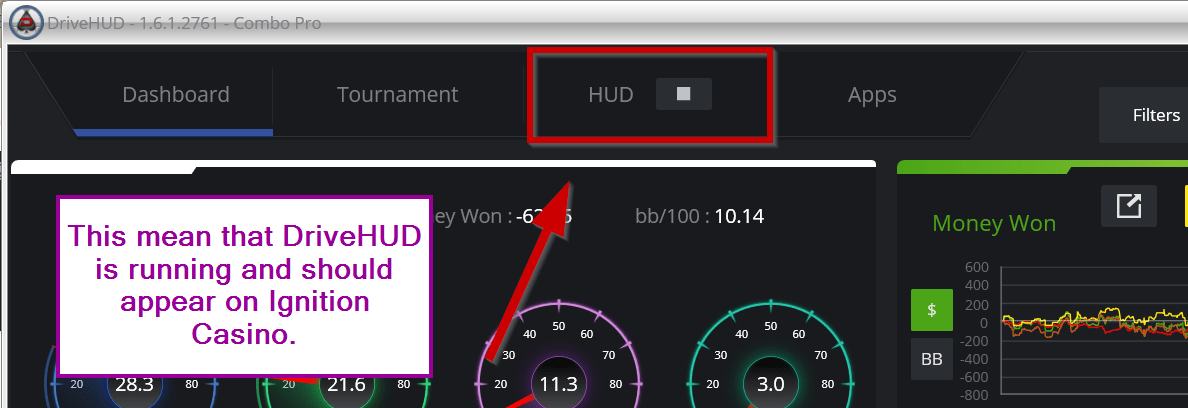
To run a HUD on Ignition Casino / Bodog poker with DriveHUD you only need to do the following:
1. Load up DriveHUD (we recommend doing this first).
2. Load up Ignition Casino or Bodog poker(Ignition skin).
3. Just make sure the HUD start/stop button in the HUD tab at the top of DriveHUD shows a stop sign (meaning it’s running and to click it would stop it).
As long as that’s in place, a HUD will show up on Ignition. If you don’t have a HUD running on there for any reason. Simply click on the headset / support looking icon at the top right hand corner of DriveHUD. Put your name and e-mail and a message that you’re having difficulty and make sure to have the attach log button checked. Our support staff will respond promptly and get you up and running.
To run a HUD on Tigergaming with DriveHUD you only need to do the following:
Load up DriveHUD (we recommend doing this first).
Load up Tigergaming.
Just make sure the HUD start/stop button in the HUD tab at the top of DriveHUD shows a stop sign (meaning it’s running and to click it would stop it).
As long as that’s in place, a HUD will show up on Tigergaming. If you don’t have a HUD running on there for any reason, simply click on the headset/support looking icon at the top right-hand corner of DriveHUD. Put your name and e-mail and a message that you’re having difficulty and make sure to have the attach log button checked. Our support staff will respond promptly and get you up and running.
To run a HUD on Sportsbetting.ag with DriveHUD you only need to do the following:
Load up DriveHUD (we recommend doing this first).
Load up Sportsbetting.ag.
Just make sure the HUD start/stop button in the HUD tab at the top of DriveHUD shows a stop sign (meaning it’s running and to click it would stop it).
As long as that’s in place, a HUD will show up on Sportsbetting.ag. If you don’t have a HUD running on there for any reason, simply click on the headset/support looking icon at the top right-hand corner of DriveHUD. Put your name and e-mail and a message that you’re having difficulty and make sure to have the attach log button checked. Our support staff will respond promptly and get you up and running.
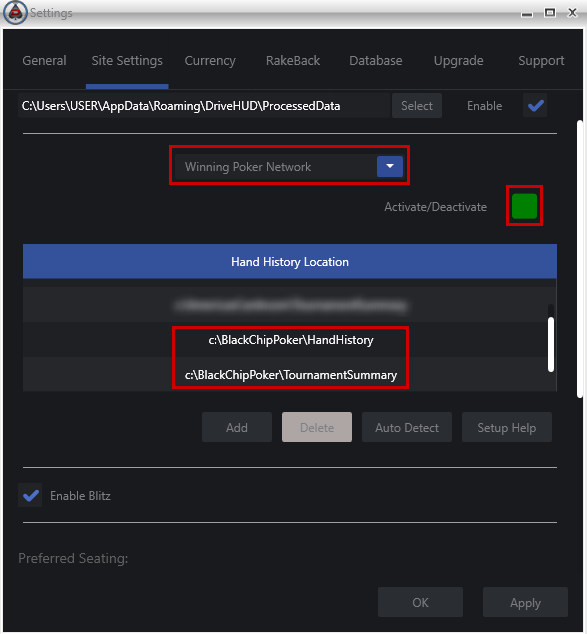
To run a HUD on Black Chip Poker with DriveHUD you only need to do the following:
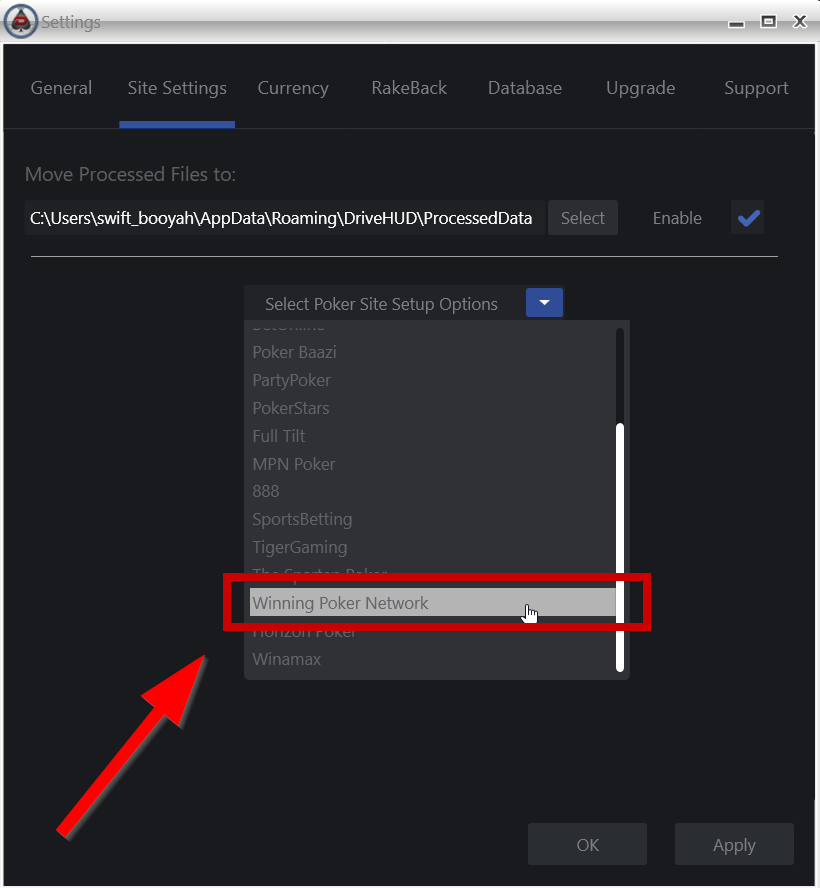
Click on the SETTINGS button icon at the top right-hand side of DriveHUD.
Click on the SITE SETTINGS tab in the settings window.
From the drop-down menu shown below, select – Winning Poker Network.
4. Make sure you have a hand history location showing, similar to above, or click the AUTO DETECT button to add your hand history folder location.
5. Click on APPLY.
Troubleshooting
If you don’t have a HUD running on there for any reason, simply click on the headset/support looking icon at the top right-hand corner of DriveHUD. Put your name and e-mail and a message that you’re having difficulty and make sure to have the attach log button checked. Our support staff will respond promptly and get you up and running.
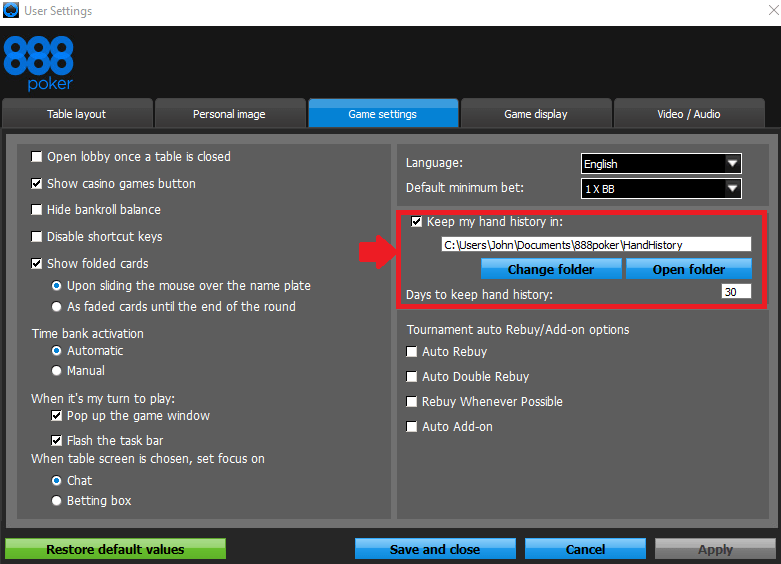
Important note: The 888 poker client must be installed in English, and hand histories must also be set in English in order for DriveHUDto read the hand histories and run a HUD. See below for more details.
You must configure the 888 poker client to save hand histories to a designated directory on your hard drive. This feature needs to be enabled on the 888 poker client in order for DriveHUD to run and display a HUD in your poker tables. By default, this is enabled on 888, but we recommend checking to ensure it’s been enabled and set by the poker client. To do so, simply do the following:
With the 888 poker client open:
From the 888 poker lobby, click on Settings > Game Settings.
Make sure that Keep my hand history in is checked.
Please note the default location where 888 is saving your hand histories.
Click APPLY to save the settings.
Setup 888 poker hand history auto import folder
The hand history and site settings should automatically setup on its own in DriveHUD for 888. If a HUD for 888 is not showing up, check your DriveHUD poker site setup by doing the following:
Click on SETTINGS in DriveHUD, located at the top right-hand side of most screens in DriveHUD.
From the settings pop-up, click on SITE SETUP.
From the drop-down menu under the move processed files to selection, select the poker site – 888.
If there are no hand history locations listed, select AUTO DETECT.
If the hand locations look correct for your computer setup, click on APPLY at the bottom right-hand corner. If they do not show any folders or do not look correct, highlight them and click DELETE, and then click ADD. Manually add the 888 hand history folder directory, which is typically located at c:\users\(your CPU username)\Documents\888poker\handhistory
Preferred seating
To set preferred seating properly, both DriveHUD and the 888 poker client must have the same seats set. To set your preferred seat, in the poker lobby select Settings -> Game Display from the main menu.
Use the drop-down menu to select each table size that you play, and then choose your preferred seat for each. A check will appear to confirm your preference. Once finished, click Save and close to save your preferences.
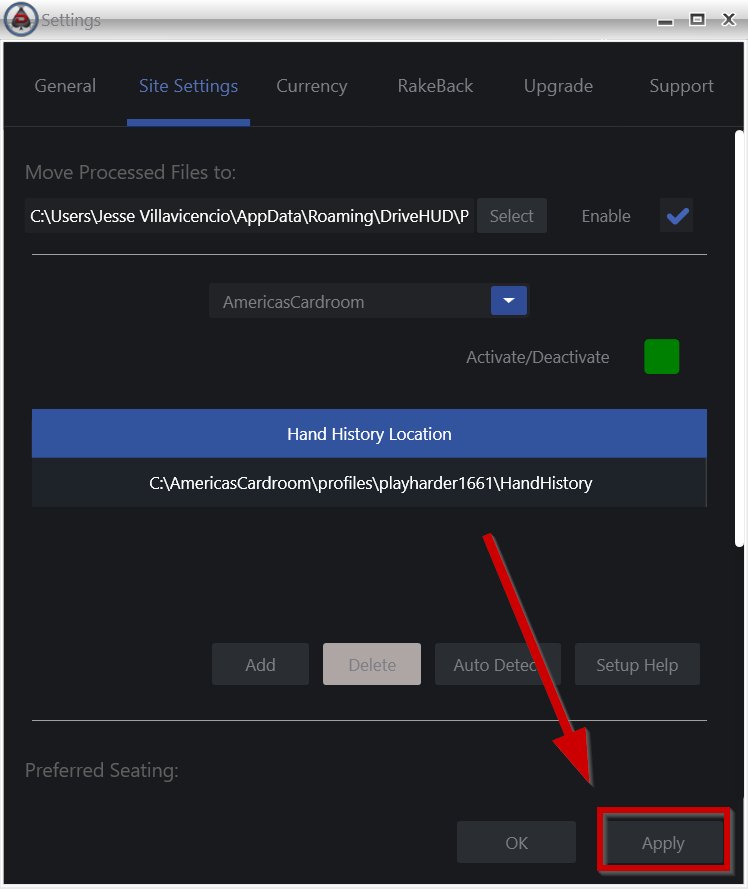
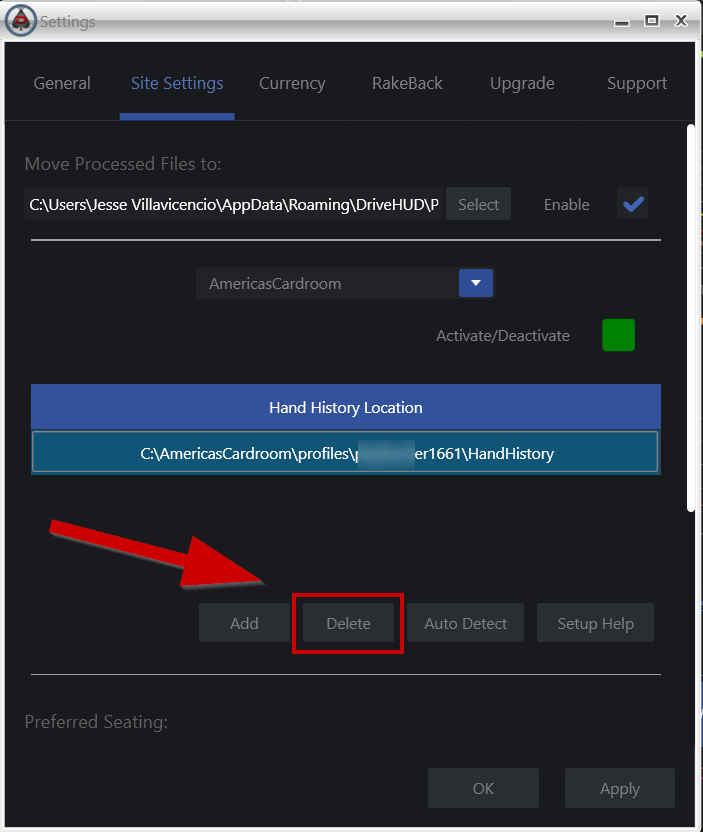
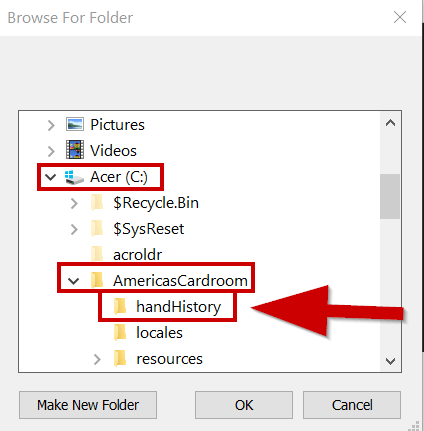
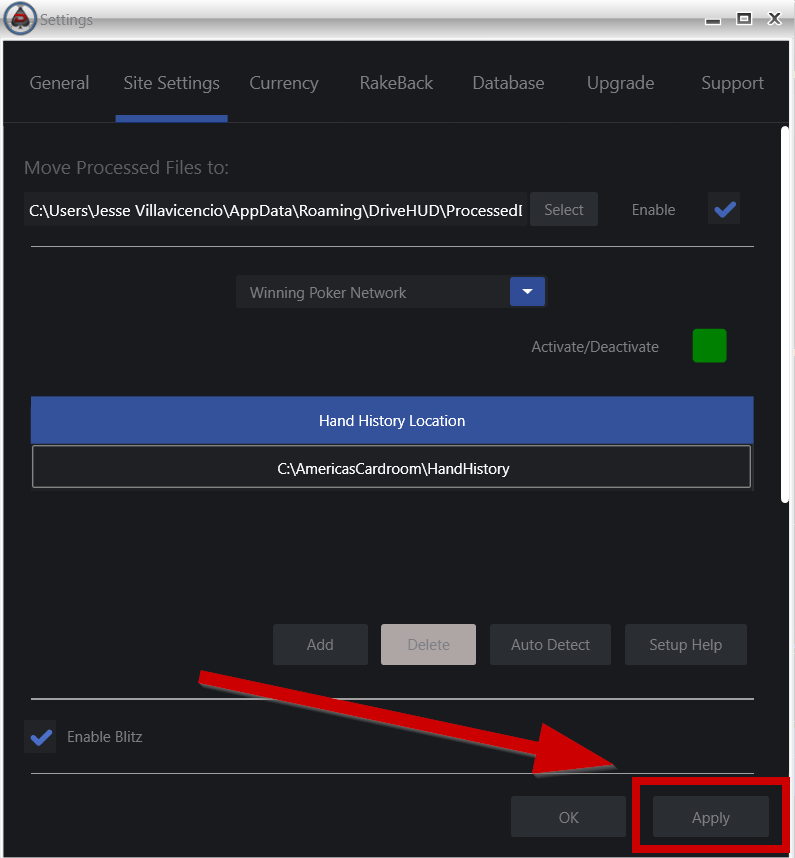
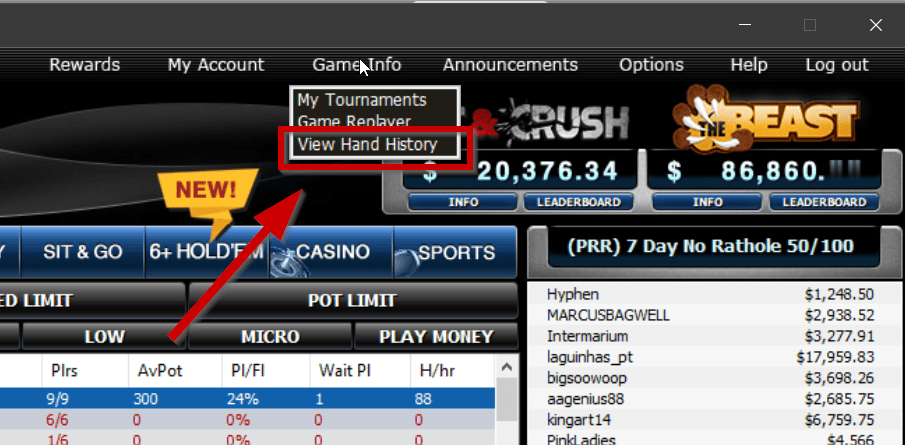
To run a HUD on America’s Cardroom with DriveHUD, the following needs to be done including enabling hand histories on America’s Card Room Client:
1. Click on the SETTINGS button icon at the top right-hand side of DriveHUD.
2. Click on the SITE SETTINGS tab in the settings window.
3. From the drop-down menu shown below, select – Winning Poker Network.
4. Delete the currently selected hand history directory (not the archive folder).
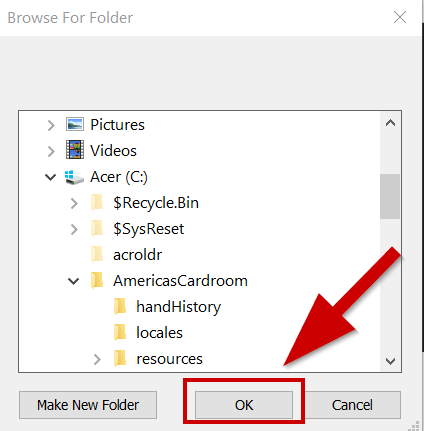
5. Click on Auto Detect to set the correct path. Alternatively, you can click Add and Set the hand history location to C:\AmericasCardroom\handHistory.
6. Make sure that the Activate/Deactivate button is GREEN. If it’s RED, click it so it turns GREEN.
7. Click on APPLY.
Enable Hand Histories on America’s Card Room
America’s Card Room (The Winning Poker Network) client will automatically save hand histories to a designated directory on your hard drive. You need to make sure this is enabled in order for DriveHUD to pick up the hands, launch a HUD, and save your hand histories in its database.
To see where your hand histories are stored for American’s Card Room (WPN), do the following:
1. From America’s Card Room lobby, click on Game Info -> View Hand History.
2. Click Options
3. Please note the default location where American’s Card Room (WPN) is saving your hand histories under Destination Folder.
Troubleshooting
If you don’t have a HUD running on there for any reason, simply click on the headset/support looking icon at the top right-hand corner of DriveHUD. Put your name and e-mail and a message that you’re having difficulty and make sure to have the attach log button checked. Our support staff will respond promptly and get you up and running.
The main RUN interface of Player X-ray is used to run notes on your entire database, by note profile, individual note, or all available notes. This should typically only be done one time, as player x-ray will automatically take notes anytime you’re involved in an online poker game. The run function is used if you decided to delete all your notes, and re-write notes for all players in your database, or you’re running it for the first time. Once you run a profile or all notes from this section, you won’t have to do it again. Please note that running time to write notes will vary based on database size and performance of your system. A typical 2-gigabyte DriveHUD database will generally take between 5-15 minutes to run.
A) Run – This is the Run menu option of player x-ray that will allow you to run notes on your entire poker database at once.
B) Run by… – This option allows you to run notes on your entire database 3 different ways. 1) By profile: You select a predefined profile from section D and click Start. This will run all of the notes that are listed for that profile only. 2) By Note: This will run one specific note only on your entire database. This option is handy if you’ve created a new note, and want to add it to all opponents all at once. 3) All notes: This option will run every note that exists in the database on every single player in your database. This option takes the longest to complete.
C) Start – Once you’ve made your Run by selection, and selected a profile if applicable, you then click START to begin the automated note writing process. The progress of the notes will be shown in the progress bar below. We recommend not playing in games at the time of running x-ray from the start menu.
D) Profile – When you’ve selected By Profile from section B, you then must select a profile in section D by clicking and highlighting it, and then clicking START to begin the note writing process.
E) Status Bar – This will show the current progress of the notes that are being written.
The profiles menu allows you to create or edit existing profiles. Profiles are sets of notes that were created from the notes menu. The following is an overview of how to use the profiles section of Player X-Ray.
A) Profiles menu – This section allows you to open a list of existing profiles, edit them, create new ones, or delete existing profiles.
B) Profiles list – This is where the current list of profiles is shown. To edit a profile, or see what notes exist in it, highlight that profile and the list of notes will be shown in Section C.
C) Notes list – This is the complete list of notes that exist in Player X-Ray. From here you can highlight notes, and add them to the currently selected (highlighted) profile by double-clicking the note or clicking on the right arrow key from (D).
D) Add remove note – When the right arrow is clicked, this will add the currently selected note from Section C to Section E. If you highlight a selected note from Section E and click the left arrow key, it will remove the note for that profile.
E) Selected Notes – This is the complete list of notes that are included in the currently selected note profile from Section B. You can double-click on any note in this section to remove it, or select the left arrow key from D, to remove a note. Once a note is removed, it can be added back into that same profile again.
F) Add Profile – Clicking this menu option will allow you to create a new profile. A pop-up menu will appear asking you for the new profile name. Enter it and click SAVE to create a new note profile.
G) Edit Profile – This option allows you to edit the profile name.
H) Delete Profile – By clicking this you will be asked if you’re sure you’d like to delete the currently selected note profile from Section B. By clicking yes, it will remove the entire profile. Once this is deleted it cannot be restored.
Player X-ray is an automated note-taking application that will allow you to see right through your opponents’ strategies in order to make the best possible adjustments to their game. Below is a quick overview video of how to use Player X-ray with DriveHUD.
From the notes menu option in Player X-ray, you can edit existing notes, create new notes, export notes to another user, or delete notes. The following is an overview of the Notes menu options.
A) Notes – This is the main menu option which allows you to edit and create notes.
B) Street Option – Select which street you’d like to edit notes for. Pre-flop notes, on the flop, turn or river.
C) General note options – From the general section, you can edit several options that correspond to the note you’ve selected from the list of notes section (section E). Any option that is changed it automatically saved.
D) Advanced / Simple mode switch – When you enter the notes menu, the edit options for notes defaults to SIMPLE mode editing. To go into more advanced editing options, click on the Advanced button.
E) List of notes – This section provides a full list of available notes. Some notes are grouped together and can be expanded or contracted by clicking on the main note option (example, clicking 3-bet will collapse all notes that are in the 3-bet sub-group). To create a new Group, click and highlight the pre-flop group at the top of section E, and click on ADD from the bottom menu (Option L). Then from the pop-up menu, check the group option, add your new group title, and click SAVE. To add a new note, just click on ADD from the bottom menu (option L), and enter the name of your new note, and click SAVE.
F) Title of Note – This displays the current title of the note you are editing.
G) Limit variety – Here you can select which limits you’d like the note to apply to, no-limit, pot-limit, or limit. The default option is set to all three.
H) Number of players – You can restrict the number of players a note is written for. For example, if you want to write a note that only applies in heads-up games, you can un-select all of the other player number options, and only check the heads up box. The default setting will apply to all player table sizes.
I) Position – Here you can limit what your note will apply to based just on position. The default setting enables all positions.
J) Pre-Flop Action Facing Hero – This option creates a note based on what action the player who is the focus of the hand (hero) is currently facing. Unopened means that no one has called or raised in the pot yet. 1 Limper means someone has just only called pre-flop. 2+ Limpers means there is more than one person who has called pre-flop without any raises. 1 Raiser means hero is facing on the person who has raised only. Raiser + Caller(s), means hero is facing a raiser plus one or more callers pre-flop. 2 Raisers means that hero is facing a pot that has already been 3-bet pre-flop (a raise + and additional raise). Every note that is written is looking at the hand from Hero’s perspective and hole cards.
K) Position of 1st Raiser – You can add options that will limit the note being written based on only a specific position from the table.
L) Add Note – Click here to create a new note or note group.
M) Edit Note – This will allow you to edit the name of a note or group.
N) Export – After you create a note, you can click this option to export it, so it can be imported on player x-ray program.
O) Delete – You can select to delete any existing note by clicking and highlighting it from Section E, and then click Delete.
P) Position of 3-bet – You can specify a particular position or positions of a 3-bet that has occurred for your note. The default setting is for any position to apply.
Q) Misc – Here you can set to minimum and maximum size of the pot. If you set both settings, it will only apply if it’s between those two sizes. You can also set whether the hand went to showdown, or if the hand applies to cash games, tournaments, or All-in pre-Flop.
R) Hole Cards – Here you can limit which hands apply to your note. The default option is to allow all hands. Any hand that is selected (in blue) will apply to the note. Any hands in grey will not apply.
S) Quick Select Hand Groups – By clicking any of the options in this section, you can quickly add an entire group of hands. To add all pocket pairs, for example, click on the pocket pairs option. To remove all pocket pairs, click on the pocket pairs button again.
T) Select All/None – To select all hand groups, click Select all. This will highlight all of the hands in blue. To remove all hands, choose select none. This will remove all hands and turn them grey.
U) Displayed Note – Select this option to edit what text will appear in relation to the note you’ve selected.
V) Include Board – If this option is selected, it will include as much of the entire board as exists for the hand so you can see the hand and the actual board together with the note. Example: If Hero’s hand was AcQc and the final board was Jc5h7dTcKc, the note would appear as: Name of note [AcQc(Jc5h7dTcKc)]. If this option is not checked, the same example would appear as: Name of note [AcQc].
W) Note Editor – Here you can edit or enter whatever you’d like to display as the text for the note you’re editing. You can enter as long of a title or format as you’d like.
The advanced mode setting in player x-ray provides more detailed options for writing automated notes. The following is an overview of the advanced mode options.
A) Actions – This is a list by list filter, to create a note based on the action taken by the hero. These actions can be set by street, from pre-flop actions, to flop, turn and river (section C).
B) Simple Mode – This button is to switch back to simple mode and out of advanced editing mode.
C) Street Actions – Here you can select which street you’d like to create an action filter for.
D) Action Sequence – The first action taken by the hero can be set to the following options. Any – which means all actions will be applied, bet, check, call or raise. Again, this is the first action taken by the hero. If you select Bet, Raise or Call, you’ll be given additional options to make this action based on the size of the pot in percentage as well.
Example: If you wanted to create a filter where hero check-raised the flop between 75-90% of the pot, you’d select the flop option from section C, then in the action sequence you’d set the first action to CHECK, and the second action to RAISE, and enter 75 and 90 in the between pot size percentage.
E) Filters – This option shows a complete list of filters that you can add or remove from your note, by double clicking on a filter in section F, and adding it to section H.
F) Filter List – This list is sectioned into pre-flop actions, flop, turn, river, and other actions. Any filter you want to apply to your note, you can double-click to add, or use the right arrow from Section G to add it to Section H.
G) Add & Remove – To add a filter to your note, click and highlight the note in Section F, and then click the right arrow to add it to Section H. To Remove a filter, you can highlight it in Section H, and click the left arrow to remove.
H) Selected Filters – Here you’ll see all of the filters that are currently applied to the select note being edited. You can double-click on any note in the selected filters section to remove it, or the left arrow from section G.
I) Hand Values – From this option, you can select which specific kinds of hands that you want to apply to your note. The default setting will use all hand values.
J) Street Selection – Choose the value of Hero’s hand to filter for based on the flop, turn, and river. You can look for a hand value for only one street, two streets, or all 3 streets.
K) Any Hand Value – A specific hand value that doesn’t include flush or straight draws can be selected. To select more than one type of hand, press CTRL + Left click to select as many hand values as you’d like. You must first uncheck any hand value option box, and then select which hands you’d like to add as a trigger for your note.
L) Any Flush Draw Value – Specific types of flush draws can be added as a trigger, as well as selecting the option that NO flush draw was present. To select more than one option, press CRTL + Left click.
M) Any Straight Draw Value – Specific types of straight draws can be added as a trigger, as well as selecting the option that NO straight draw was present. To select more than one option, press CRTL + Left click.
N) Board Texture – From this option you can select and edit specific board textures for the flop, turn, and river.
O) Board Texture Street – Each street can have a different board texture, or just set a specific texture for the flop turn or river from these options.
P) Filter by Texture – Once you set any of the texture options, you’ll have the filter by texture radio button selected. To switch this back to any board texture, just select any texture radio button.
Q) Flush Cards – Select if the board is Rainbow (3 different suits), Two of one suit, or three of one suit (monotone).
R) Number of open-ended straight draws – This option is especially helpful for Omaha players. You can set the limit of the number of straight draws present. Any number that is set will create a max threshold for this filter.
S) Number of Gutshots – Here you can set the maximum number of gutshots that are possible for Hero’s hand.
T) Number of possible straights – You can set the number of possible made straights equal to, greater than, or less than a set number from this option.
U) Highest Card – If this option is selected, any card you select from the drop down will represent the highest card that will be displayed on the board. It can be any sequence of cards, just no cards higher than the selected card. This is especially useful for creating boards with low or high flops for example.
V) Exact Texture – If there’s a specific sequence of board cards you’d like to create a note for, you can select those from this option. Anything that isn’t exactly this sequence will not have a note written for it.
W) Is paired – You can set an option that only creates notes on if the board is paired or not paired.
A) Settings menu – From here you can access a list of settings for Player X-Ray.
B) Enable auto-notes – This option is enabled by default. Auto notes allow DriveHUD to generate and create Player X-Ray notes in real time while you play online poker. To disable the option, simply uncheck enable auto notes. By disabling it, DriveHUD will not automatically generate notes. You can then go back at any time and from the RUN menu, run a profile and select notes.
C) Take notes on Hero – This option is disabled by default. When this is checked (enabled), Player X-Ray will generate notes on the currently selected Hero in DriveHUD. To enable this option simply check it, and DriveHUD will generate notes on your currently selected hero in real time or if you run a complete notes profile manually.
D) Enable advanced log – This option is disabled by default. Only enable this if you’ve been asked to by support. This creates a more detailed log for developers to analyze any potential issues.
E) Create notes for hands since – The option is disabled by default. If you are going to run a note profile manually, and just want to write notes from a specific date to the current date, you can enable this option and select a date. Any hands prior to this date will not have notes written for it.
F) Delete notes older than – This option will delete any notes that are older than the set date. Choose a date from the drop-down calendar, and then click delete notes. If you want to delete all notes, regardless of date, click the Delete All notes button.
If your HUD is present on any poker site you’ve played on with DriveHUD, then your data is all present in DriveHUD’s database. To view your poker data simply enter your poker site player name ID into the drop-down list at the top right-hand side of DriveHUD here:
Once you do this, all of your player data will display in DriveHUD.
If you’re experiencing issues with DriveHUD for any reason, and can’t find help within the manual or knowledge base, please contact our support from this form. We’re happy to help you get up and running: