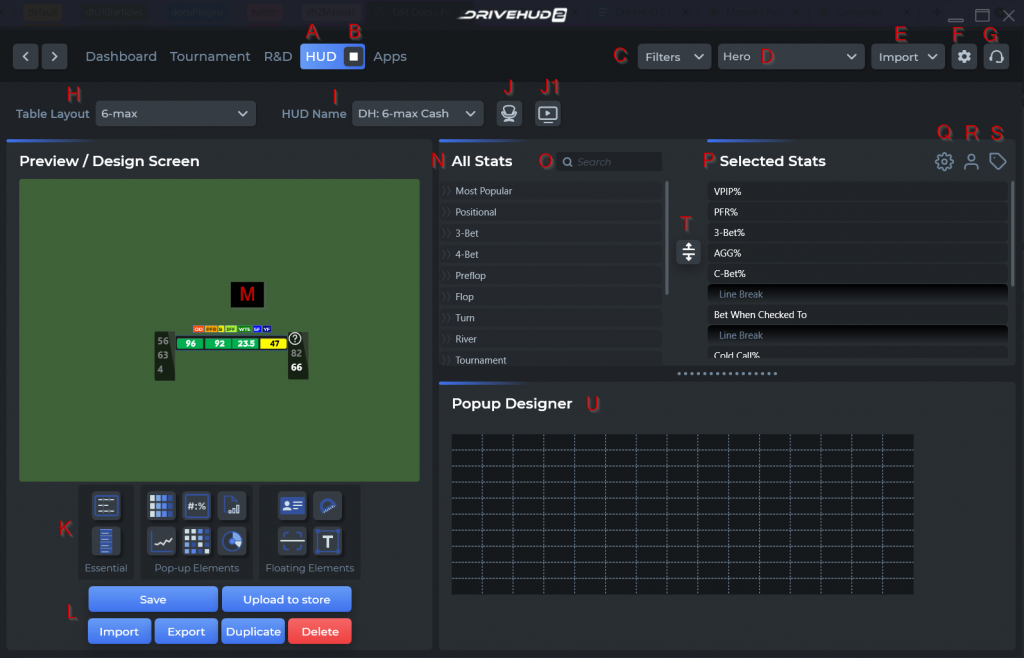
A) HUD tab – This is where you can design your own HUD or select your default HUD for each game type, poker site, and table type you’ll be playing.
B) HUD Run Button – This will default to RUN. Click the Stop button to stop the HUD, or if it’s already stopped, the PLAY (or run) button to engage and run the HUD. If the HUD is running, you will see the STOP button by default.
C) Filters – Click this drop-down to create a custom filter, or load a quick date filter from the drop-down. Once filters are created, they are shown between the Reports section of DriveHUD and the hand grid section.
D) Selected Player – Click here to select which player’s stats you want to load in the Dashboard. You must have a selected player in order to show hand data. You can select from the drop-down list, or begin typing in a player name to locate that player. Player name HERO is used in DriveHUD 2 by default for your player name. To Change this, go to the settings menu (Letter F).
E) Import – Click here to import hand histories that DriveHUD 2 supports. You can import by file or by folder. You can also import by file and click CTRL + left mouse click to select multiple files.
F) Setting Menu – The settings menu contains options such as General options, Site settings, Currency settings, Rakeback and Bonus settings, Database Settings as well as Upgrade and License Renewal.
G) Support Button – Click this to send a message to support, access the online manual, the support forums, or the knowledge base. By default, if you send a message to support it will attach your logs. Only click the Send Advanced Log checkbox if you’ve been asked by support to send your advanced logging information.
H) Table Layout Pull Down – This is the number of seats for the HUD type you’re selecting or looking to create.
I) HUD Name Pull Down – This is the name that is given to the HUD profile. When you save a new HUD, you’ll be asked to name it. When you do, it will then show up on this list for you to select, edit, delete, or export.
J) Preferred Seating Button – Click on this to load the preferred seat settings for each poker site. Each poker site that you’d like to have preferred seating seat needs to be set in the Config -> Site Settings options. For more on setting preferred seating, see this knowledge base article – Set Preferred Seating.
J1) Video Tutorials Button – Click on this to open a library of video tutorials for DriveHUD 2.
K) HUD Design Elements – These are the drag and drop elements you use to create a custom HUD. The following is an overview of each button:
- Line Bar Graph – This is a line bar graph pop-up that can be added to nearly any stat by simply dragging and dropping it to a stat in the HUD designer window (M).
- Text Box – A text box element can be added to your HUD by dragging and dropping this element. The size of the text is dependent on how big you make the text box once added to the HUD designer window (M). Simply click on the text box and drag one of the four corners out or in to increase or decrease the size of the text.
- Graph – A linear graph can be added to any stat by dragging and dropping this element to a stat. The graph will display current session graphing for the stat you drag the element to, and it will also show the last 4 showdown hands for that player.
- Tilt Meter – Drag and drop a tilt meter indicator to any space in the HUD designer Window. The Tilt meter will light up and show how likely it is that a player is beginning to tilt or in full tilt.
- Player Profile Icon – This element will display an icon based on what type of player you’re facing. These icons and player types are set in the player profile editor (R).
- 4-Stat DH Box – Drag and drop this element to add a 4 stat solid HUD element to your HUD. The 4 stat box is a larger standout design for featured HUD stats that you want to be able to see quickly and easily.
- Heat Map – Heat maps can be dragged to any HUD stat and also to any pop-up stat. Simple drag and drop the heat map until the stat is highlighted in white and then drop onto the stat.
- Break Line – Use this element to create breaks between sets of stats in pop-up stat windows. Drag and drop the line between any two sets of stats in a HUD pop-up.
- Plain Stat Box – Drag and drop this to create a HUD box that can be used to select and add new stats to your HUD. Each plain stat box you drag to your HUD will have a separate set of HUD stats that will be shown in the Selected stats window (P). Highlight the plain stat box, and then drag and drop stats from the HUD stats window (N) to the Selected Stats window (P) to populate and add new stats to your plain stat box.
- Bumper Stickers – Bumper stickers will appear when an event that matches the set criteria is met. Bumper stickers can be placed anywhere on your HUD design element but will appear invisible on the table until a criterion is met for your bumper stickers. The bumper sticker can be deleted, added and edited from the bumper sticker editor (T).
- Population Report – This is HUD element which allows you to add population report stats to your HUD. See what most opponents are doing on average for your site, and how much their stats deviate from the population.
- Hand Chart – You can add this element to any stat or pop-up stat to display a visual hand chart. Any custom hand chart created in DriveHUD 2 can be added to a HUD for quick review and reference.
L) Save and Import Buttons
- Use the Save button to save your current layout to DriveHUD. You’ll be asked for a name, or you can overwrite an existing HUD layout.
- Delete will allow you to delete the current HUD profile.
- Import will allow you to import a DriveHUD 2 layout from another user or one you’ve created on another system.
- Export will allow you to export your layout and share the HUD with others.
- Duplicate will copy all of the same settings you have for your currently selected HUD onto a new table size format of your choice.
- And lastly, Upload to store will allow you to upload your own HUD to the HUD store. Here, you can let others download it for free or for a fee.
M) Preview Window – This is a simple example of what your HUD will look like on a table. You can mouse over the elements to get an idea of spacing and design.
N) HUD Stats – These are where all of the available stats you can add to your HUD are. Click on any main stat section title to open the subset of the available stats for that section. To add a new stat to your HUD, simply drag and drop it into the Selected Stats section (section Q). To remove a stat, drag and drop it back to the HUD stats section.
O) Search HUD Stats – Here, you can quickly do a search of all available HUD stats. This is especially useful when you already know what stats you are looking for.
P) Selected Stats – This section stores your selected stats for your HUD. To remove any stat, simply drag and drop it over to the HUD stats window (section N).
Q) General HUD Settings – This section allows you to adjust various HUD settings such as HUD Opacity, Data Freshness, Filter data for only, Number of Players, Apply to specific table, Hide HERO HUD, Hide Track Conditions Meter, Flash Hole Cards, Increase opacity on mouse over, Remove background of plain stats boxes, Separator of stats of plain stats box, and Padding of stats of plain stats box.
R) Player Profile Editor – This section allows you to create player profiles that will appear on your HUD if that player falls between the selected stat ranges that are listed. You can edit any of the default player type profiles, or create one of your own.
S) Bumper Sticker Editor (badge system) – This section allows you to create or edit any bumper sticker you’d like to appear on a table for your HUD. A bumper sticker is any sticky note you’d like to appear on your HUD that will alert you to some exploitable tendency or pattern of play your opponent is doing. You can
T) Line Insert – Click on this to insert a new line indicator into your HUD. It will show a small blank line between your stats. This will create a line break in your HUD. To remove this line break, drag and drop it back into the HUD Stats section.
U) Popup Designer – this is a completely new pop-up designer that will create countless data points for you to consider.